Complete Indoor Setup Guide for LED Grow Lights for Microgreens
I started indoor microgreens with low expectations. First trays looked weak, stretched, kind of disappointing, honestly. Light was the missing piece; I didn’t notice it early. After adding LED grow lights, things shifted fast. Plants stopped leaning, and color turned deeper green. The setup felt more controlled, with less random growth happening.
Now I don’t depend on the weather or the window light. Everything runs under fixed timing, the same routine every cycle. Beginners usually ignore the lighting part, I did same mistake. Once fixed, the whole system starts behaving better indoors.
Why LED Grow Lights Are Important for Microgreens
LED grow lights matter because indoor microgreens depend fully on artificial light. I saw weak trays when the light was inconsistent. Stems became long, leaves looked pale. Not good at all. LED gives steady brightness, no fluctuations day to day. Plants respond better under stable conditions.

Growth becomes compact and healthier looking. Indoor setup feels reliable after that change. No need to worry about cloudy days or room direction. Light control becomes the main factor. Everything else starts working properly once the lighting is fixed in place.
Role of light in microgreens growth
Light decides the structure of microgreens, not just water or soil. I noticed that strong light keeps plants short and firm. Weak light pushes them upward, thin and unstable. Color also changes to a darker green under proper lighting. LED helps maintain that balance indoors. I keep trays under the same light hours daily.
Plants adjust slowly but consistently. Photosynthesis improves, and growth feels more controlled. Without light, everything gets messy quickly. Even taste feels slightly different later. Light not only supports, but it also shapes the final quality.
Why is natural sunlight not enough indoors
Natural sunlight indoors sounds good, but it behaves unstably. I tried window setups many times, but the results kept changing. Some days strong light, some days dull. Plants reacted each time differently. One side grows more, the other side weakens. That uneven pattern creates poor trays.
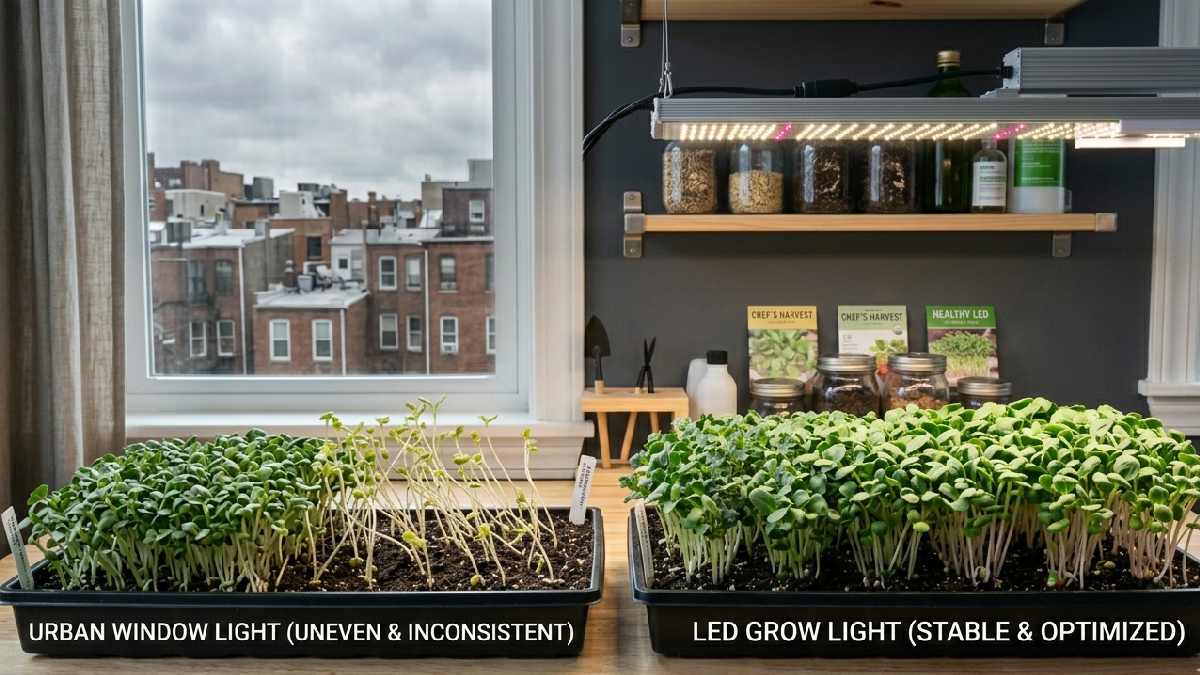
Winter makes it worse, sunlight gets too low. Buildings also block direct exposure. Curtains reduce intensity further. Microgreens need consistency; sunlight fails there indoors. LED removes this problem fully. Stable light makes growth predictable every cycle without guessing.
Benefits of LED grow lights.
LED grow lights improved my setup in many ways. First thing is stability, the same light every day. Plants stop behaving randomly. The second thing is control; I adjust height easily when needed. Third is low heat; trays don’t dry fast. Electricity use also stays low compared to old bulbs.
Growth becomes compact and clean-looking. Indoor space becomes reliable for farming. No weather dependency anymore. Even beginners can manage it easily. Once installed, the system runs smoothly without much attention. Makes microgreens growing simple indoors.
Best Light Spectrum for Microgreens Growth
I noticed that the light spectrum changes everything in microgreens growing. First trays under the wrong light looked weak and stretched. Color was dull, growth uneven. After some trial, I realized spectrum matters more than I thought. Different light colors push different plant behaviors. Indoor setup needs balance, not random bulbs.
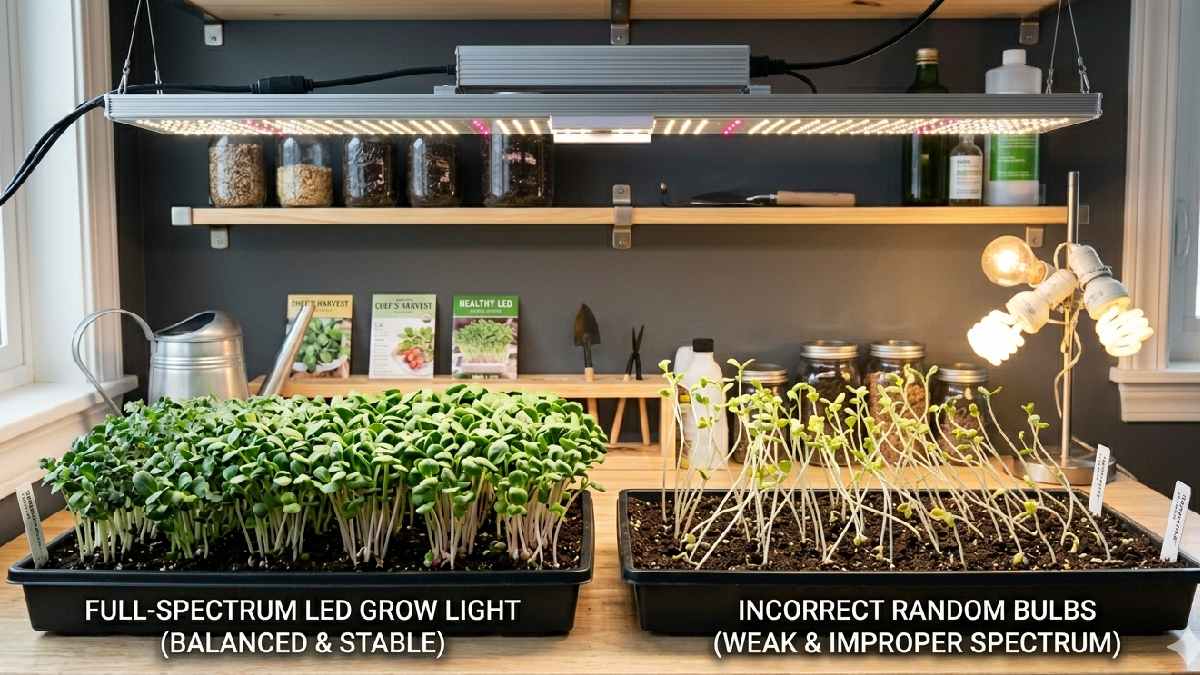
Now I stick to a controlled LED spectrum. Growth feels more stable, leaves stay compact. Kitchen setup looks more alive now, less guessing involved. Beginners miss this part often, then struggle with weak trays. Once the spectrum is right, everything starts working more smoothly indoors.
What is full-spectrum LED light?
Full-spectrum LED light gives a mix of all useful wavelengths for plants. I use it in most of my trays now. It looks like soft white sunlight indoors. Not too yellow, not too blue, just balanced. Plants respond better under this type of light. Growth stays even, leaves don’t look pale or stretched.
I noticed microgreens behave more naturally under it. It feels simple, one light doing everything. Beginners don’t need multiple setups. Just plug and grow kind of system. Indoor trays become easier to manage, and results stay predictable every cycle.
Blue light vs red light effect on growth
Blue light affects structure; I saw plants stay short and firm under it. Leaves become thick and color deep green. Red light does something different; it pushes faster upward growth. Stems get longer, sometimes weak-looking. I tested both separately, results felt very different each time.
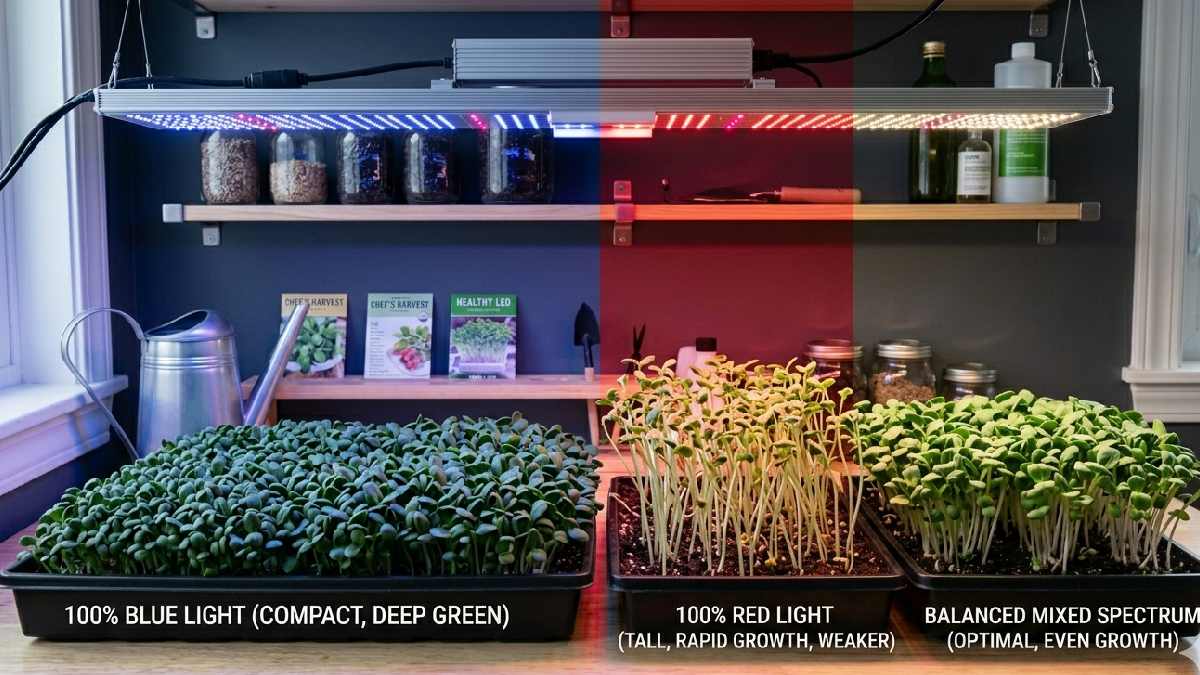
Blue gives control, red gives speed but less stability. Microgreens need a balance between both types. Without balance, trays look uneven or stretched out. I made that mistake early on. Now I avoid single-spectrum use. Mixed light gives a healthier shape and better indoor growth pattern overall.
Ideal spectrum range (4000K, 6500K)
I found the 4000K to 6500K range works best for indoor microgreens. This range feels closest to natural daylight. Plants stay compact, leaves look fresh and green. Below this range, the light feels too warm, and growth becomes slow or uneven. Above it, the light feels too cool, and plants look weak sometimes.
I tested different bulbs, same pattern repeated. This range stayed most stable overall. I keep using it for all trays now. No extra adjustments needed. Beginners can rely on it easily. Simple setup, steady results, and less confusion during the growth cycle every time indoors.
Ideal Setup for LED Grow Lights
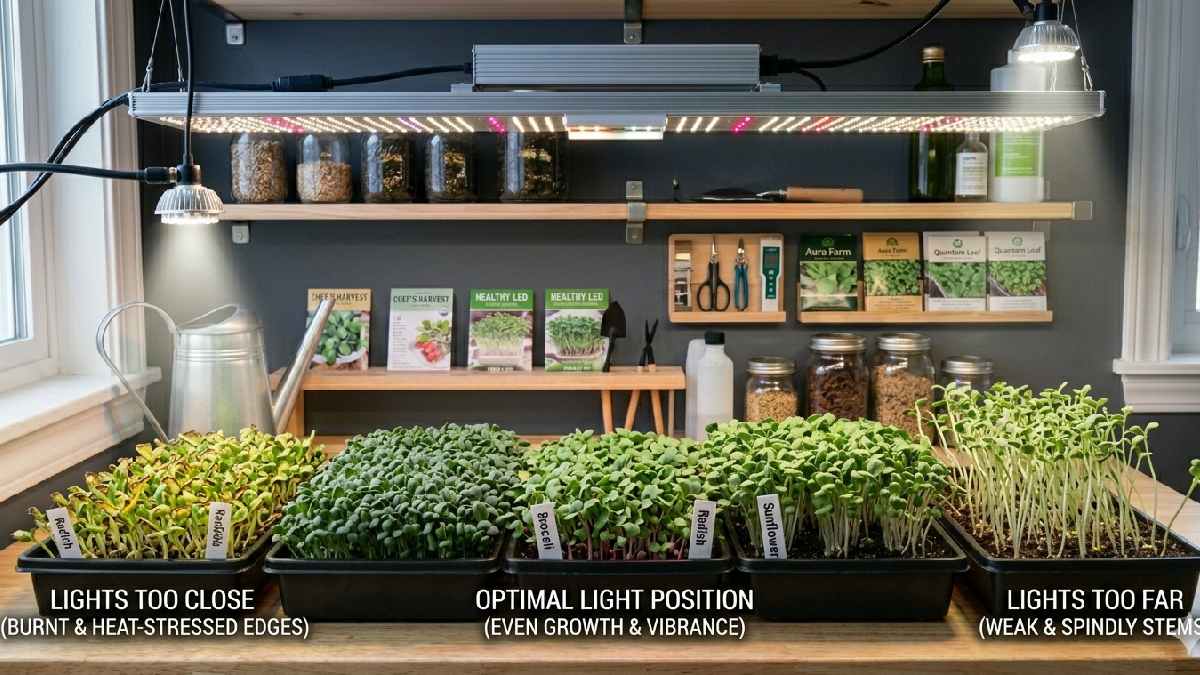
I learned that setup matters as much as light itself. The first few trays looked uneven because the positioning was wrong. Light too close burned edges, too far made weak stems. Now I focus on the balance between distance, intensity, and layout. Indoor microgreens respond fast to setup changes.
Even small adjustments show a visible difference within days. I keep things simple, no complex systems. Just correct height, steady brightness, and proper spacing. Rack or table, both work if the setup is right. Once light is arranged properly, growth feels controlled and consistent every cycle.
Best distance between light and trays
I keep LED grow lights at a balanced distance from trays. Usually, around 6 to 12 inches works best in my setup. Too close and leaves start curling or getting dry spots. Too far and stems stretch upward, looking weak. I tested different heights, and the results changed quickly every time. Microgreens react fast to light distance; even small shifts matter.
Now I adjust height slowly instead of guessing. Beginners often place lights randomly, then face uneven growth. Correct distance keeps plants compact, green, and strong without extra effort or complicated adjustments indoors.
Recommended light intensity (PPFD basics)
PPFD simply means how much usable light plants receive. I didn’t understand it at first, just followed brightness. Later, I noticed weak trays came from low intensity. Microgreens don’t need extreme light, just a balanced range. Around 100 to 200 PPFD works fine in my setup. Higher intensity sometimes stresses leaves indoors.
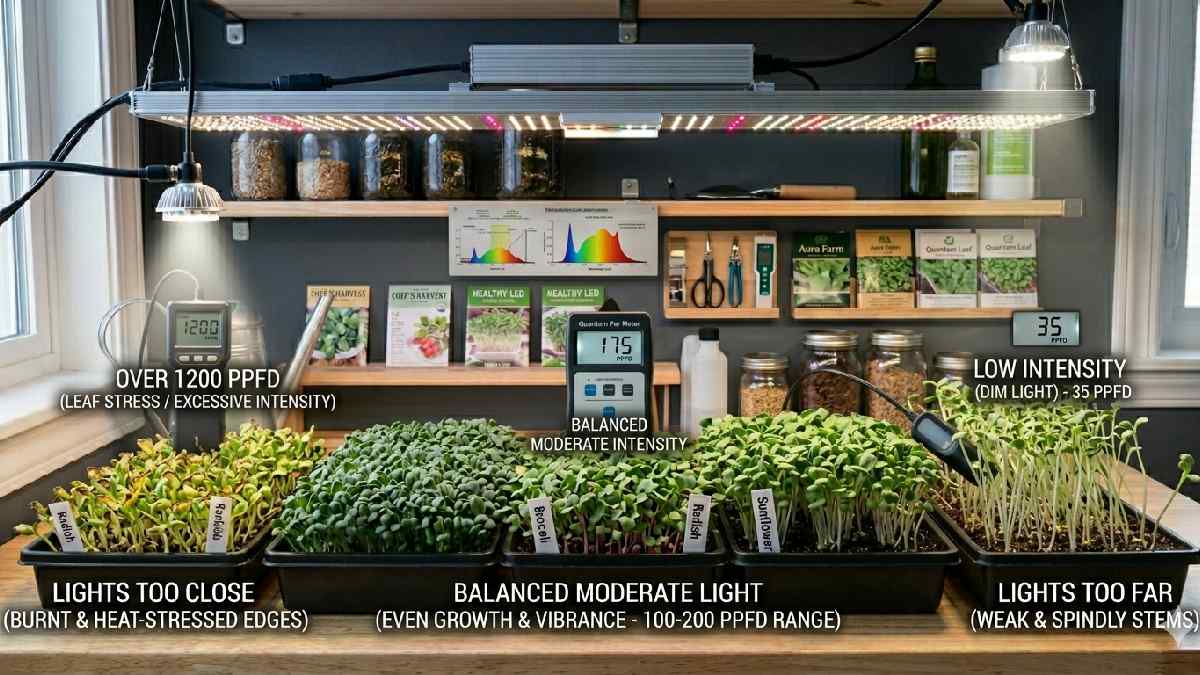
I keep it moderate and stable instead of changing often. Consistency matters more than numbers alone. Beginners don’t need a deep technical setup. Just avoid very dim or too strong light. Balanced intensity gives healthy, compact growth with steady green color across all trays.
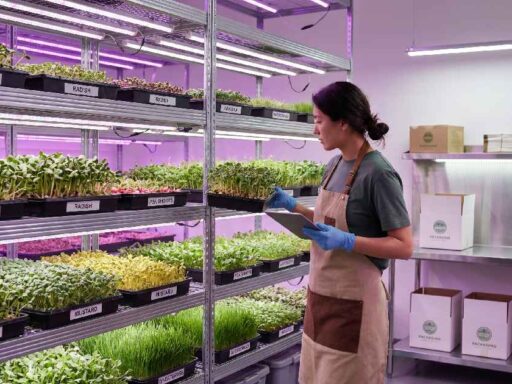
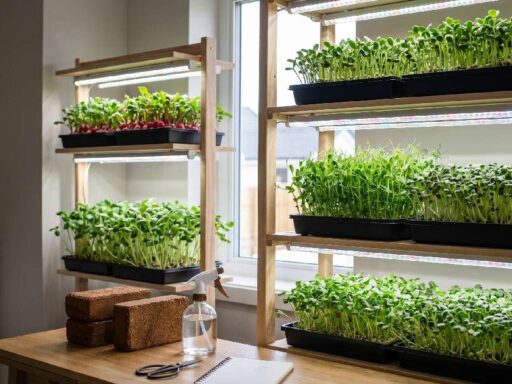
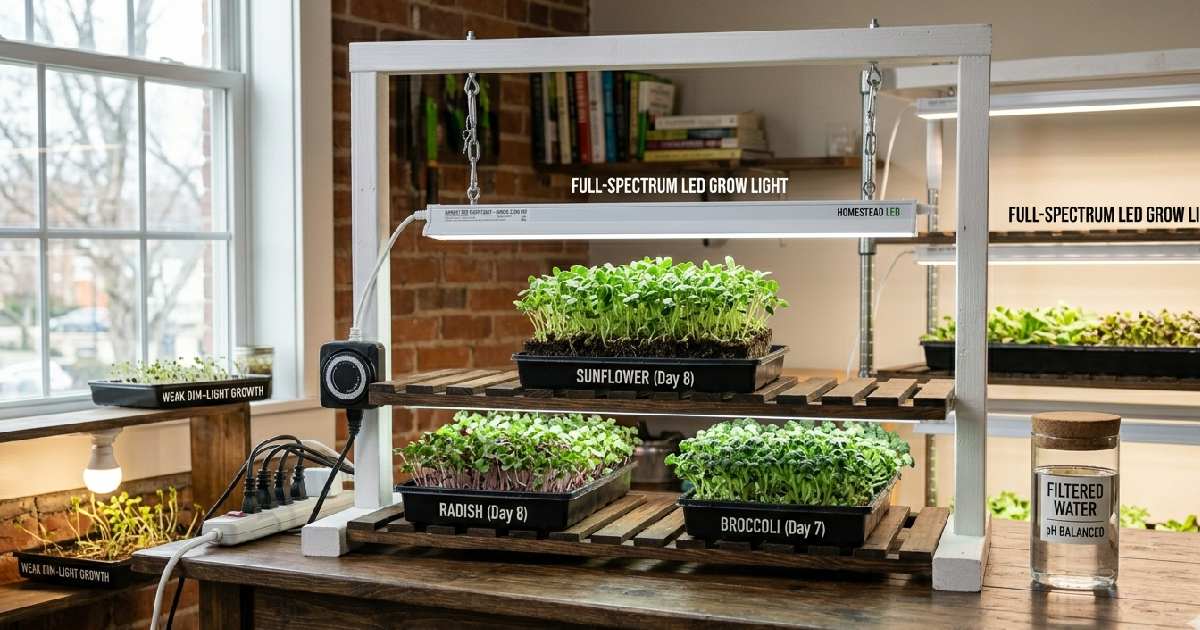
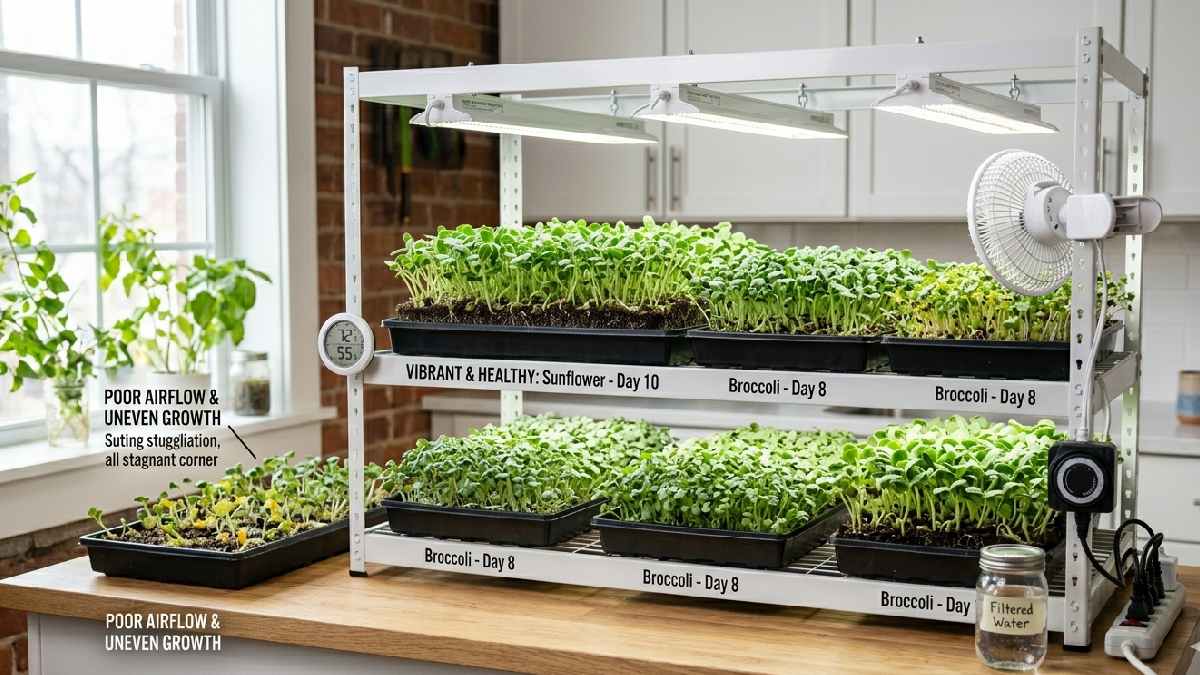
Vertical rack lighting setup
I started using vertical racks when space became limited. Multiple trays stacked one above another, each level getting its own LED strip. First-time setup felt tricky, but later became a simple routine. Light placement matters here; every layer needs equal exposure. I adjust spacing so no tray blocks another.
Airflow also becomes important in a stacked system. Growth stays efficient even in small rooms. Beginners like this because space use becomes smart. I noticed consistent harvest from each level. Vertical setup turns a small indoor area into a mini farm without taking extra floor space at all.
How Many Hours of Light Do Microgreens Need?
I learned light timing is more important than I expected. Early trays, I kept random, some days long light, some days short. Growth looked uneven, not stable at all. Later, I followed a fixed schedule, and results improved fast. Microgreens respond strongly to daily light hours.
Too little light makes weak stems, too much stress leaves. Now I keep strict timing every cycle. Indoor setup feels predictable. Once light hours are controlled properly, plants grow compact, healthy, and consistent without much daily confusion or guesswork involved in routine care.
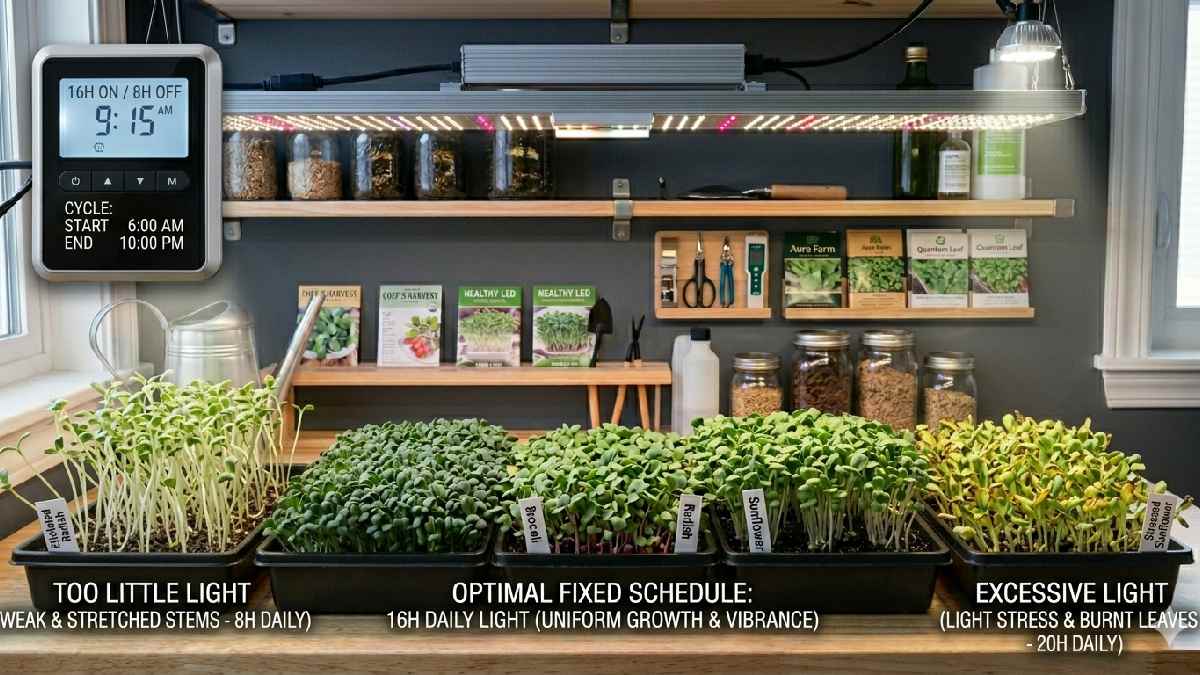
Recommended daily light cycle (12to 16 hours)
I usually keep microgreens under light for 12 to 16 hours daily. This range works best in my experience. Less than that makes plants stretch and look weak. More than that, sometimes stress leaves slightly. I tested different cycles, and this range stayed most stable. Growth feels balanced, not rushed or slow.
I turn the lights on in the morning and off at night. Simple routine. Beginners don’t need complex timing. Just stick to this range. Plants adjust quickly and start growing in a compact, healthy way across all trays indoors without extra adjustments or confusion.
Importance of light consistency
Consistency matters more than changing light timings daily. I noticed uneven growth when the schedule kept shifting. Plants don’t like random light exposure. One day long light, next day short, the results looked messy. Now I follow the same timing every day. Growth becomes predictable, stems stay strong. Leaves develop evenly across the tray.
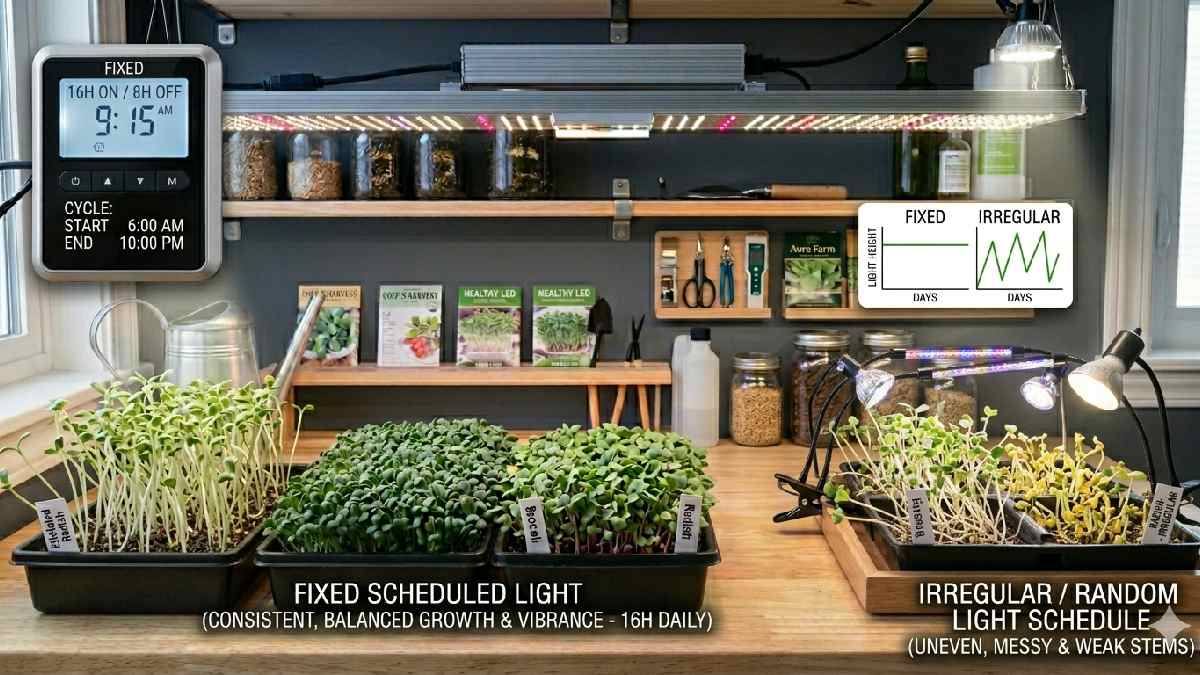
Indoor microgreens respond slowly but clearly to routine. Even a small inconsistency shows later in quality. Beginners often ignore this part. A stable routine keeps the system simple. Same light hours daily create a healthy rhythm and better harvest quality without extra effort or complicated management inside the home setup.
Using timers for automation
I started using timers when I got tired of switching lights manually. It made everything easier. Lights turn on and off automatically now. No guessing, no forgetting. Growth became more stable after that. Microgreens follow an exact cycle every day without interruption. I still check trays, but timing is fully automatic.
Beginners benefit a lot from this small tool. It removes human error completely. Even if I’m busy, setup keeps running. Consistent light schedule improves quality over time. Simple automation brings a more enjoyable indoor farming experience and reduces daily effort while maintaining healthy plant growth indoors consistently.
Types of LED Grow Lights for Microgreens
I tried different LED setups for microgreens over time, results changed a lot. Some lights worked better for racks, some for single trays. In the early days, I used a random bulb; growth was uneven. Later, I understood that each LED type has its own purpose. Light shape, coverage, and intensity all matter.
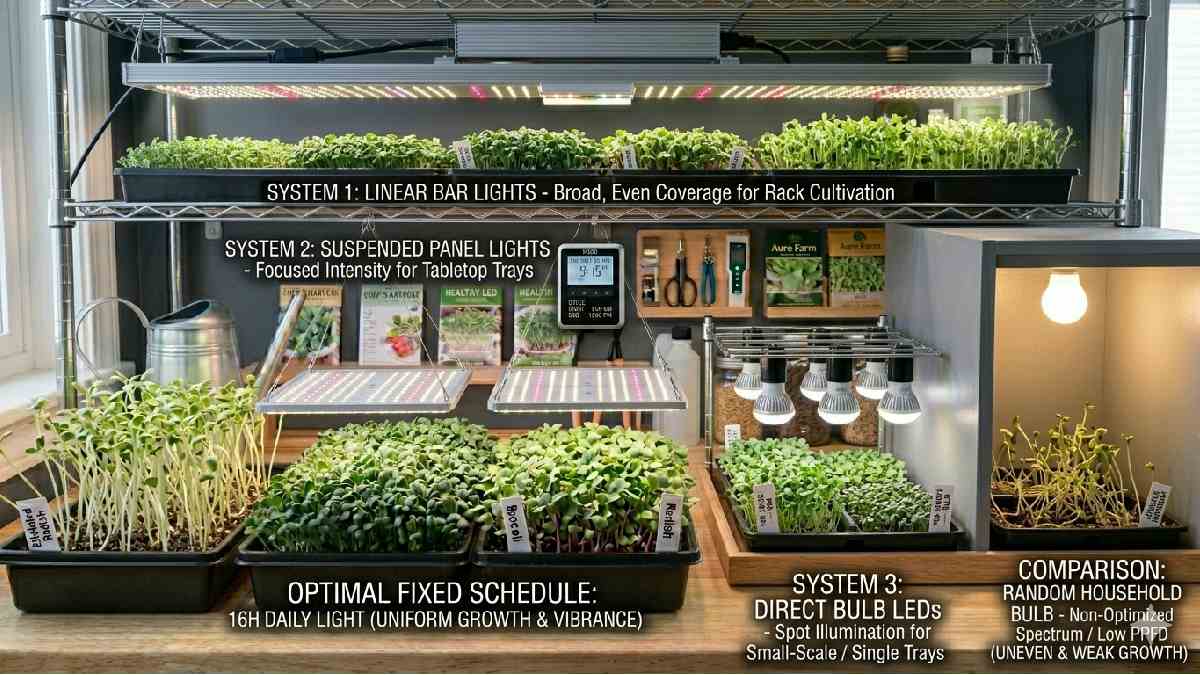
Indoor setup improves when the correct light type is chosen. Now I match light with system design. Racks, tables, or shelves each need a different approach. Once the right LED type is selected, growth becomes smoother, plants stay healthy, and overall, the indoor setup feels more controlled and stable.
LED light bars (best for racks)
LED light bars work best in vertical rack systems. I use them when multiple trays are stacked together. They fit easily under each shelf, giving direct light to every level. Coverage feels even, not too concentrated in one spot. I noticed plants grow more uniformly under bars. They are also easy to install and move.
Wiring stays simple, no heavy setup needed. Beginners like them because they don’t feel complicated. Each tray gets equal exposure when placed correctly. Rack systems become efficient with light bars, making indoor microgreens growing more organized and space-friendly overall at home.
LED panel lights (multi-tray systems)
LED panel lights cover a wider area compared to bars. I use them for multiple trays placed side by side. One panel can light several trays at once. Growth stays balanced when height is adjusted properly. I noticed fewer shadow issues with panels. They give a broad, even spread of light across the setup.
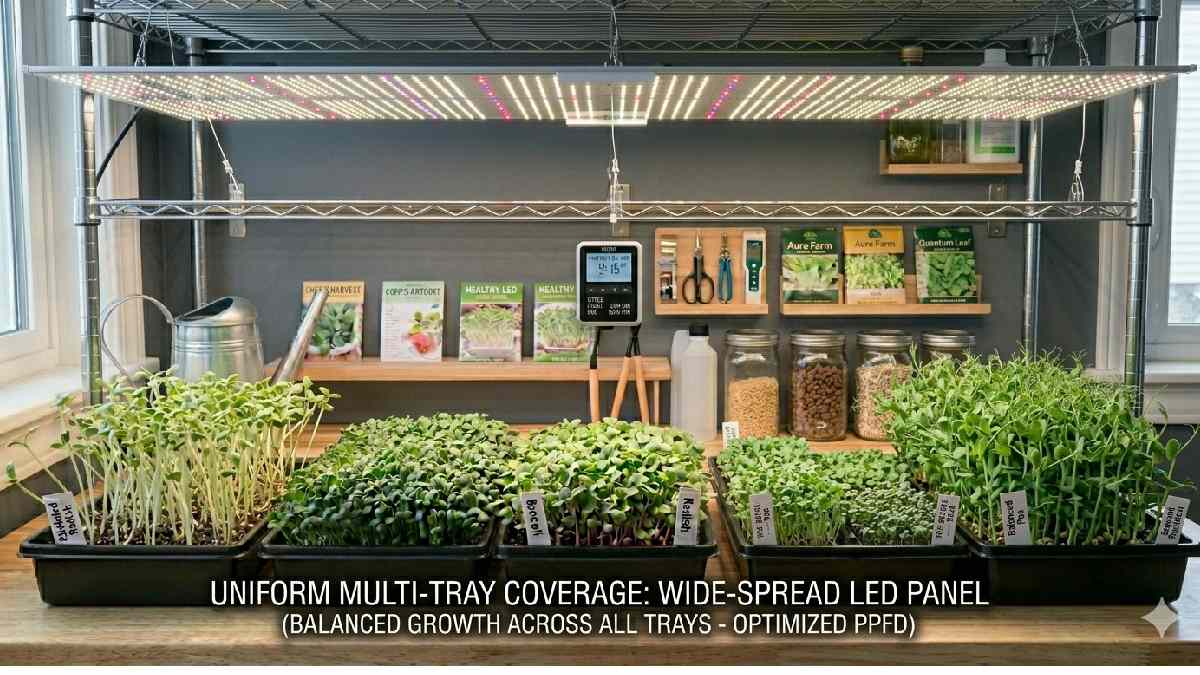
Installation is simple, just hang above the trays. Beginners find them useful for medium setups. Not too technical, still powerful enough for indoor growth. Panels work well in kitchen or room setups. Overall, they give stable performance for multi-tray microgreens growing systems indoors consistently every cycle.
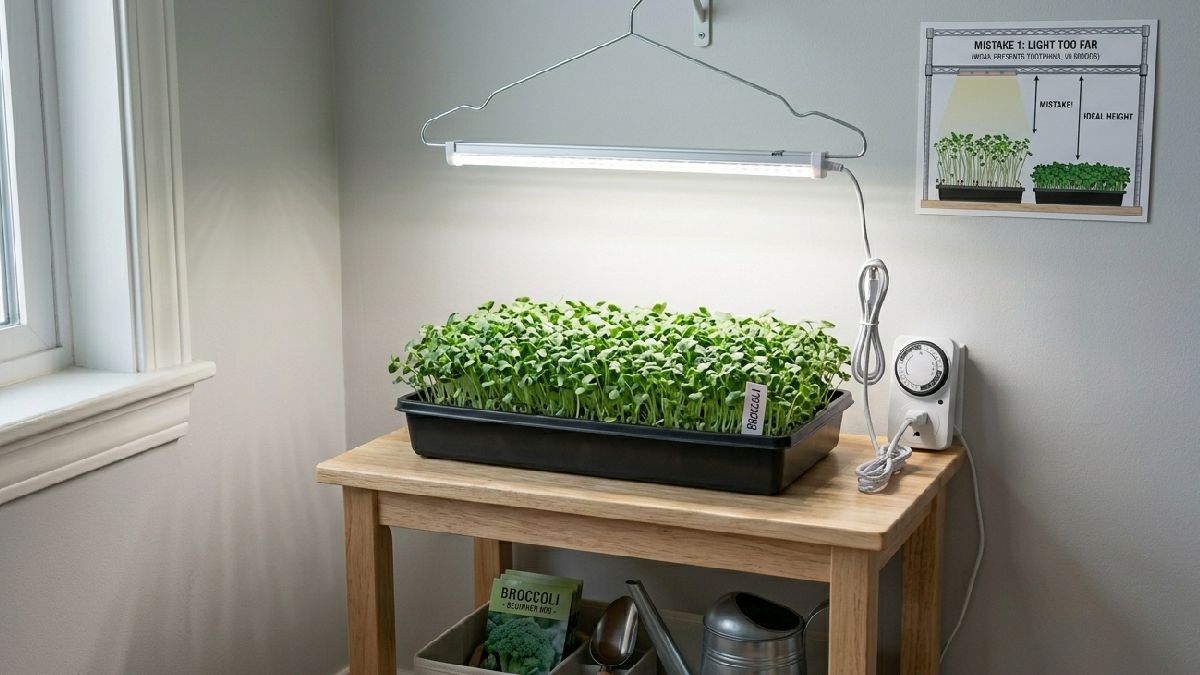
Budget LED shop lights (beginners)
Budget LED shop lights are what I started with. Very simple setup, nothing advanced. I placed them above a single table with trays. They worked fine for early experiments. Light is not very specialized but still effective. Growth was decent, though not perfect like advanced systems. I noticed slight stretching sometimes, but still usable.
Beginners like them because the cost is low. Easy to find, easy to install. No technical knowledge needed. For the starting phase, they are enough. Once experience grows, upgrading becomes easier. Simple option for learning indoor microgreens without spending much money at the beginning stage.
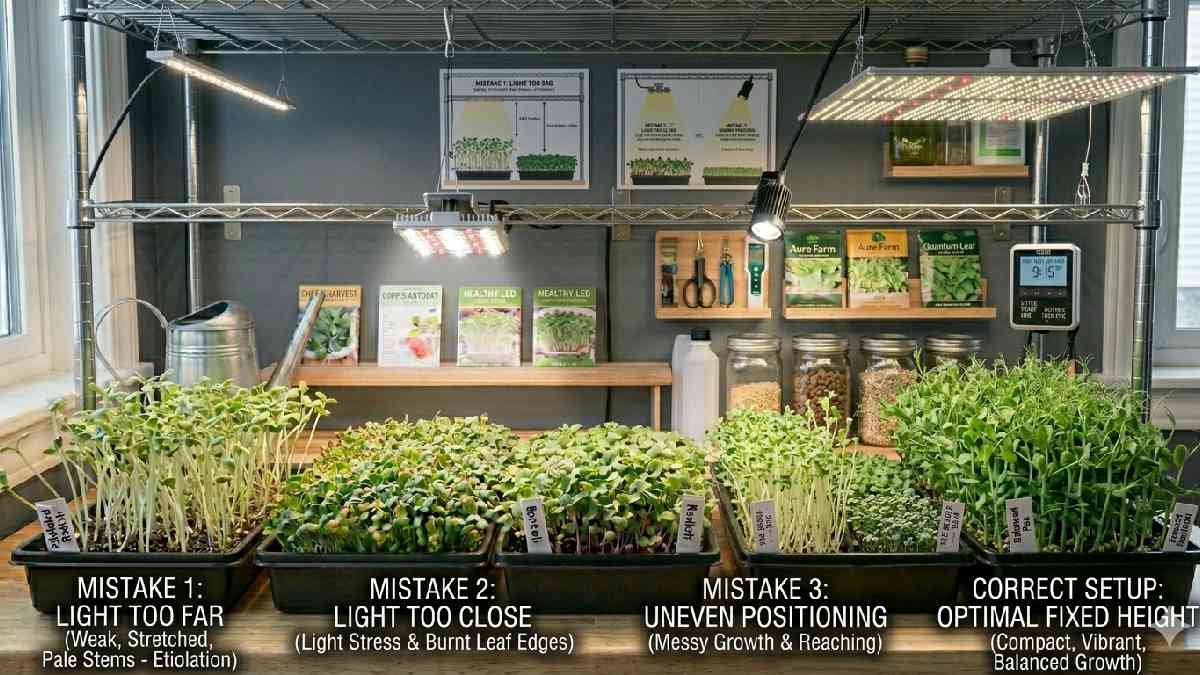
Common Mistakes When Using LED Grow Lights
I made many mistakes when I started using LED grow lights for microgreens. The setup looked simple at first, but the results were not stable. Some trays grew strong, others became weak and stretched. Plants react quickly to small changes in light.
I learned slowly through trial and error. Now I fix problems early instead of waiting. Beginners usually face the same confusion in indoor setups. Once adjustments are understood, growth becomes more controlled and consistent over time.
Incorrect light distance
Incorrect light distance caused most of the early problems in my setup. I placed LEDs too close sometimes, and leaves started curling and drying. When the lights were too far, the stems stretched upward and looked weak. Small height changes made a big difference in growth.
I now keep a fixed distance for stability. Plants respond fast to correct spacing. Beginners often ignore this step and get uneven trays. Proper distance keeps microgreens compact, green, and healthy indoors.
Using the wrong spectrum
Using the wrong spectrum gave poor results in my early trays. Warm light made plants look soft and weak. Cool light slowed growth and created uneven development. I did not understand the light color effect at the start. Now I mostly use full-spectrum LEDs for balance.
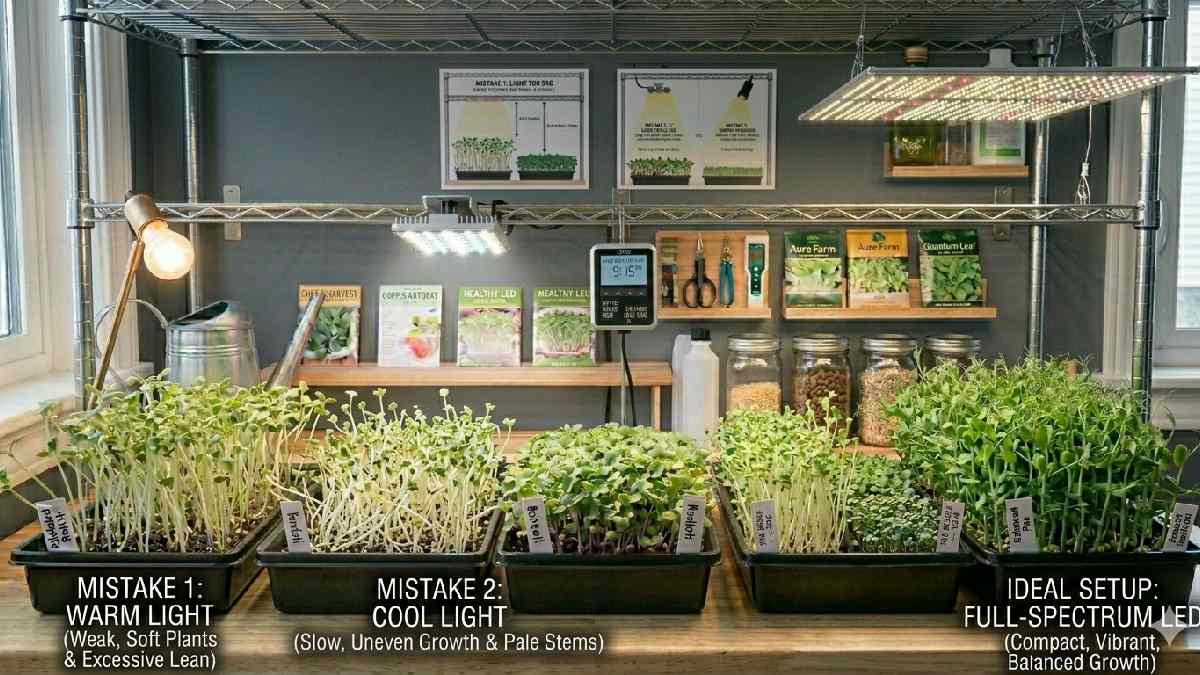
Growth looks more stable and natural green. Beginners often buy random lights without checking the spectrum. That leads to weak structure and poor quality. A correct spectrum improves overall indoor microgreens growth easily.
Over or under, lighting
Overlighting and underlighting both created issues in my trays. Too much light dried leaves and stressed plants. Too little light produced pale and weak stems. I kept changing the timing earlier without understanding the effect. Microgreens need balance, not extremes.
Now I follow a fixed daily schedule. Growth looks more even and healthy. Beginners think more light is better, but it is not true. Proper balance keeps plants compact, green, and stable in indoor setups.
Best LED Grow Light Setup for Beginners
When I first started, I thought I needed expensive gear. Turns out, not really. A beginner setup can stay simple and still give strong results. One LED grow light, a timer, and a small tray are enough. I learned that setup quality matters more than price. Keep the system easy to manage. Less confusion, better focus on growth.
Indoor microgreens do well when light stays consistent. Beginners should avoid overcomplicating things. Start small, understand the process, then expand later. A practical setup builds confidence and makes indoor growing feel less intimidating from the start.
Simple home setup idea
My first home setup was on a shelf near the kitchen wall. I used one LED light hanging above two trays. Nothing fancy, just functional. A timer controlled daily light hours, which saved effort. I adjusted the height with simple hooks. Space stayed clean and organized.
That small corner became my growing station. Beginners can do the same with very little room. Even a desk or table works. Keep things stable and easy to access. A simple setup teaches the basics without creating unnecessary stress or spending too much in the beginning.
Cost-effective lighting system
I started with budget LED shop lights instead of expensive grow panels. They were affordable and easy to install. For a beginner, this made more sense. The results were surprisingly decent. Electricity cost stayed low, which helped long-term. I focused on proper placement instead of premium brands.
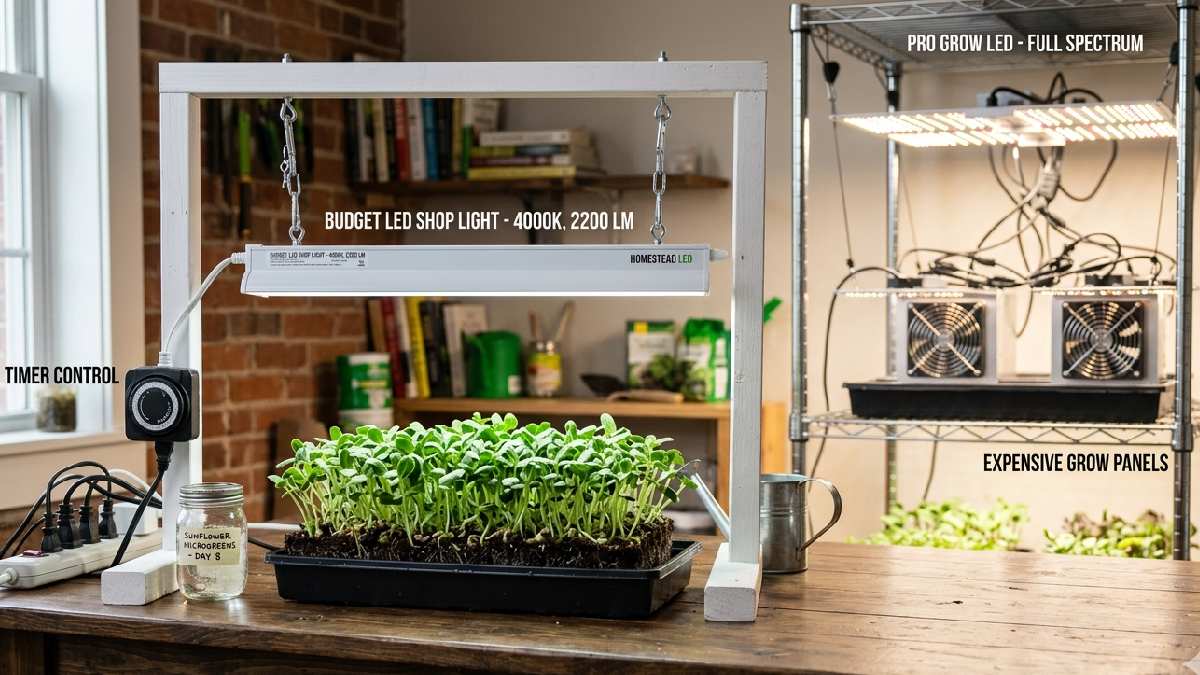
One low-cost light covered small trays effectively. Beginners often spend too much too early. That usually isn’t needed. A cost-effective system can still produce healthy microgreens if timing and distance are managed well. Good results come from consistency, not expensive equipment alone.
Recommended beginner configuration
For beginners, I suggest one full-spectrum LED light placed about 8 inches above the trays. Use a timer for 14 hours daily. Start with one or two trays only. Keep the setup on a shelf or table where airflow is decent. A spray bottle helps with watering control.
This configuration is easy to manage and gives stable results. I used almost the same arrangement in my early days. It taught me everything I needed before scaling up. Simple, practical, and effective. That’s what a beginner setup should always be.
Tips to Maximize Microgreens Growth Indoors
Indoor microgreens grow best when small details are handled properly. I learned this after several uneven harvests. Light alone is not enough. Airflow, watering, and tray placement all affect final quality. When these elements work together, growth becomes stronger and more consistent. Indoor setups need balance more than intensity.
I stopped changing things too often and focused on routine. That helped a lot. Microgreens respond well to stable care. Beginners usually improve faster once they manage the environment instead of just the light. Small adjustments indoors can lead to healthier trays and better overall harvest quality.
Proper airflow importance
Airflow changed my indoor setup more than expected. Without it, moisture stayed trapped around trays. Leaves felt damp, mold risk increased. I added a small fan nearby and noticed better results. Plants became firmer and surfaces dried evenly. Air movement does not need to be strong. Gentle circulation is enough.
It keeps humidity balanced and prevents stagnant conditions. Beginners often forget airflow because it feels invisible. But plants notice it. Proper ventilation supports healthy growth and reduces common indoor problems. A simple fan can improve tray quality without adding much complexity to the setup.
Watering balance with lighting
I once watered too much while using strong lights. The trays became stressed quickly. Watering and lighting must work together, not separately. Strong light increases moisture loss, while low light slows drying. I learned to adjust the water based on light exposure. The growing medium should stay damp, never soaked.
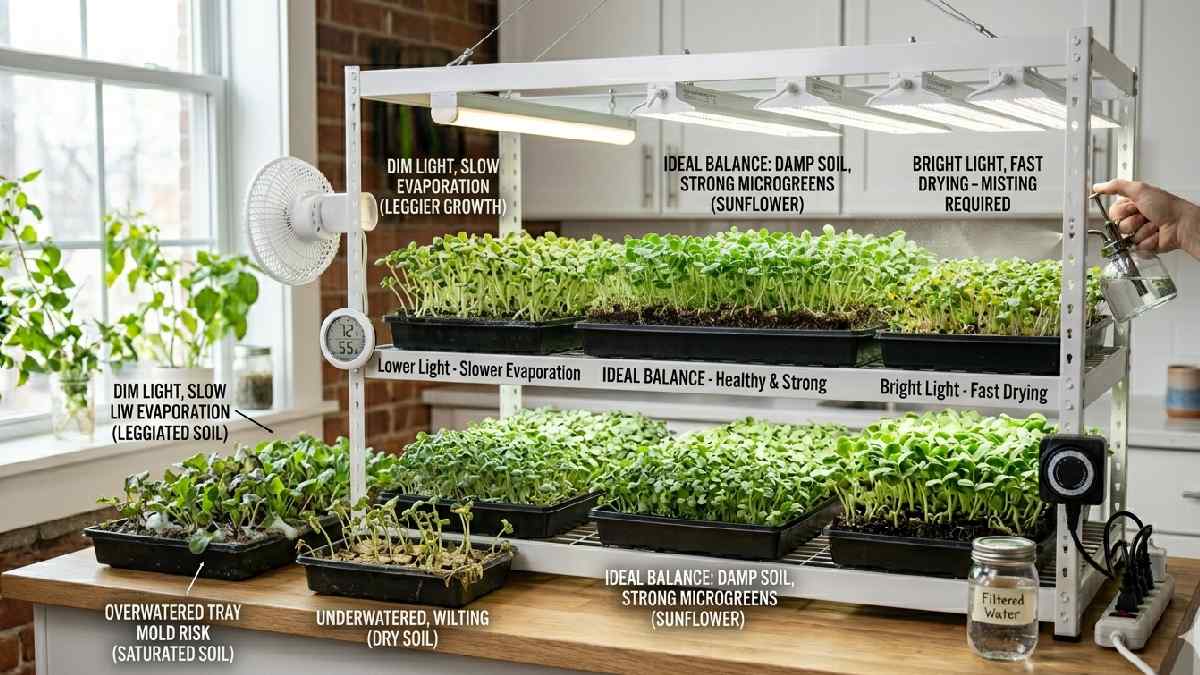
Overwatering creates mold and weak roots. Underwatering causes dry edges and slow growth. Beginners often follow fixed watering routines, but conditions change daily. Balanced moisture supports healthy development. Indoor microgreens perform better when water levels match the lighting environment consistently.
Positioning trays correctly
Tray positioning affects growth more than many people expect. I used to place trays too close together. That blocked airflow and created uneven lighting. Some trays thrived, others struggled. Now I leave enough space between them. Each tray receives proper light coverage and air movement. I also rotate trays occasionally if one side gets stronger exposure.
Height alignment matters too. Uneven placement can distort growth patterns. Beginners should pay attention to spacing from the start. Correct positioning creates balance across the setup and helps microgreens grow evenly indoors with fewer problems overall.
FAQs About LED Grow Lights for Microgreens
Can normal LED bulbs grow microgreens?
Yes, normal LED bulbs can grow microgreens if the brightness is sufficient. Results may vary, though. Full-spectrum options usually perform better for stronger, healthier indoor growth.
How far should LED lights be placed?
LED lights should stay around 6 to 12 inches above trays. Too close causes stress, too far creates weak and stretched microgreens.
Do microgreens need full-spectrum light?
Full-spectrum light is recommended because it supports balanced growth. Microgreens can grow without it, but quality and consistency improve with proper spectrum.
How many watts are required?
For small setups, 20 to 40 watts is usually enough. Larger systems need more, depending on tray size and light coverage.
Conclusion
Growing microgreens indoors with LED lights becomes simple once the setup is understood. I learned that success depends less on expensive tools and more on balance. Light distance, timing, airflow, and watering all work together. Small mistakes can slow growth, but they are easy to fix with observation.
Beginners should start with a basic system and improve gradually. Indoor growing rewards consistency more than perfection. Over time, the process feels natural and efficient. With the right LED setup, even a small corner can produce healthy, fresh microgreens all year round without relying on outdoor conditions.