
How to Grow Sprouts and Microgreens at Home
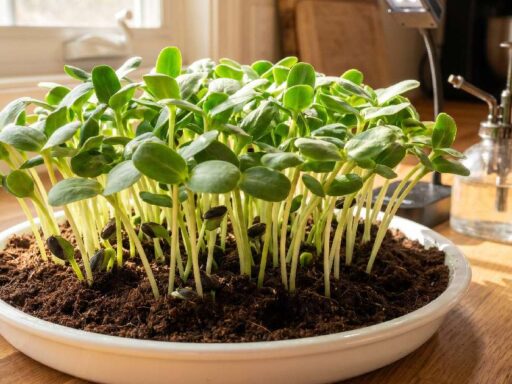
I tried many seeds in hydroponic trays; some worked better than others. Radish always comes first, fast sprout, strong color, very reliable. Broccoli feels steady, clean growth, no extra effort needed. Mustard grows a bit wild, sharp taste, quick results. Arugula adds spice, thin leaves, but strong flavor.
Pea shoots take a little longer, then suddenly grow tall and thick. Sunflower looks heavy, crunchy stems, very satisfying to harvest. Kale stays consistent, not fast but stable every time. Beginners usually start with radish or broccoli, less chance of failure. Each tray reacts differently, but hydroponics makes them all smoother to manage.
What Are Sprouts and Microgreens?
I used to think sprouts and microgreens were the same thing, but they are not. Sprouts grow only in water, no soil, no medium. They are eaten whole, root and seed included, very fast growth just a few days. Microgreens grow a bit longer; they need light and a medium like a mat or soil.
Only stems and leaves are eaten; roots stay behind. Flavor also changes; sprouts feel mild and crunchy, microgreens feel stronger and more defined. I noticed microgreens look more like tiny plants, and sprouts stay very simple. Both are easy, but they behave differently in kitchen setups.
What Are Sprouts?
Sprouts are the simplest form of growing food at home. I just soak seeds in water and leave them for a short time. No soil, no light in the beginning, just moisture doing its job. Within a few days, seeds crack open and tiny roots appear. Everything is eaten together, root, seed, and small shoot, all mixed.
Growth is very fast, almost surprising sometimes. I noticed they don’t need much effort, just rinse and wait. Beginners like them because results come quickly and setup is very easy. They feel light, fresh, and simple in taste; there’s nothing complicated about them.
What Are Microgreens?
Microgreens are young plants grown a bit more than sprouts. I usually grow them on soil or a hydro mat, not just water. They need light after germination, that’s where real growth starts. Tiny stems push up, then small leaves appear on top. Only stems and leaves are eaten; roots stay in the medium.

Growth takes a little longer, around one to two weeks. I noticed the flavor becomes stronger compared to sprouts, with a more defined taste. They look like tiny versions of full plants, just smaller and fresher. Beginners find them more “real” because they actually stand upright and green.
Sprouts vs Microgreens
I confused them a lot at the start; they look similar but act very differently. Sprouts grow only in water, very fast, just a few days, and are done. You eat everything, root, seed, small shoot, all mixed. Microgreens take a bit more time; they need soil or a growing mat plus light. Only stems and leaves are eaten; roots stay behind in the medium.
Sprouts feel soft and crunchy, taste mild, almost watery sometimes. Microgreens feel stronger, more structured, flavor comes out sharper. Sprouts are quicker but simpler, microgreens take longer but feel more like real plants. Both are easy, just different styles of growing and eating.
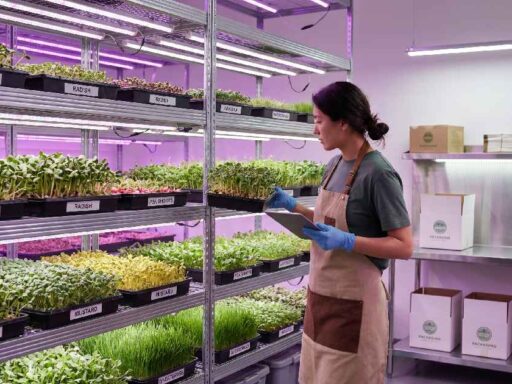
Benefits of Growing Sprouts and Microgreens
I started growing both just for fun, didn’t expect much at first. Sprouts gave me quick results, almost like instant food growing in a jar. Microgreens took a bit more time, but felt more satisfying when leaves showed up. Both save money compared to buying from a store every week.
The kitchen feels fresher, like something alive is always happening in the corner. I noticed meals look better too, more color and texture on the plate. No big space needed, even a small counter works fine. Beginners like it because mistakes don’t cost much. Simple setup, daily small growth, and fresh food anytime at home.
Nutritional Benefits
I didn’t expect much from tiny greens at first. Then I started using them daily in meals. Sprouts feel light but still carry fresh nutrients from seeds. Microgreens go a step further; the leaves look small, but the taste feels stronger. I noticed meals feel more complete when I add them, like something extra inside.
Vitamins seem packed in both, just in different stages of growth. Sprouts give quick nutrition, and microgreens feel more concentrated. Beginners often overlook this part, but it matters a lot. Small portion, big nutritional impact, that’s what surprised me most.
Easy to Grow at Home
I started growing sprouts in a simple jar, nothing fancy at all. Just water, seeds, and a bit of patience. Microgreens needed a tray, some soil or mat, and light from a window. Both felt easy once I got used to the rhythm, no garden, no big setup, just kitchen space, working fine.
I made mistakes early, overwatering mostly, but plants still recovered. Growth happens fast; you can see changes every day. Beginners like this because results come quickly and effort stays low. Even a small corner becomes a little green setup at home.
Saves Money and Space
I stopped buying greens from the store after a while, as I felt unnecessary. Sprouts grow in a jar, take almost no space at all. Microgreens use a small tray that fits easily on a shelf or counter. Both setups stay compact, with nothing big or messy around. I noticed grocery costs dropped slowly but clearly over time.
Seeds last long; a small amount gives many harvests. Even in a tiny kitchen, the setup works fine without clutter. Beginners like this because it doesn’t need extra room or budget. Simple growing, small space, but fresh food is always available at home.
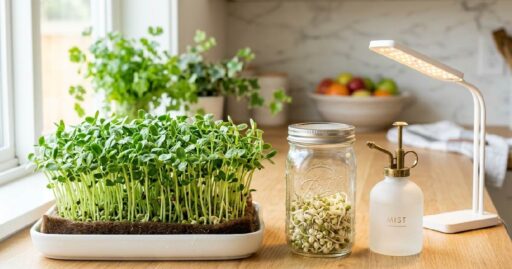
What You Need to Grow Sprouts and Microgreens
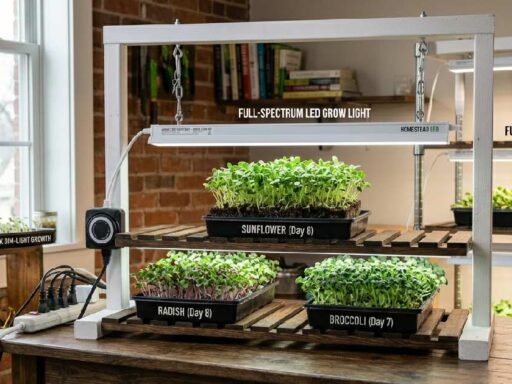
I started with very basic things, nothing special in the beginning. For sprouts, I just used a jar, some clean water, and seeds. That was enough to see growth in a few days. Microgreens needed a tray, a growing mat or soil, and a little light source. I used a window first, and later tried a small LED; both worked fine.
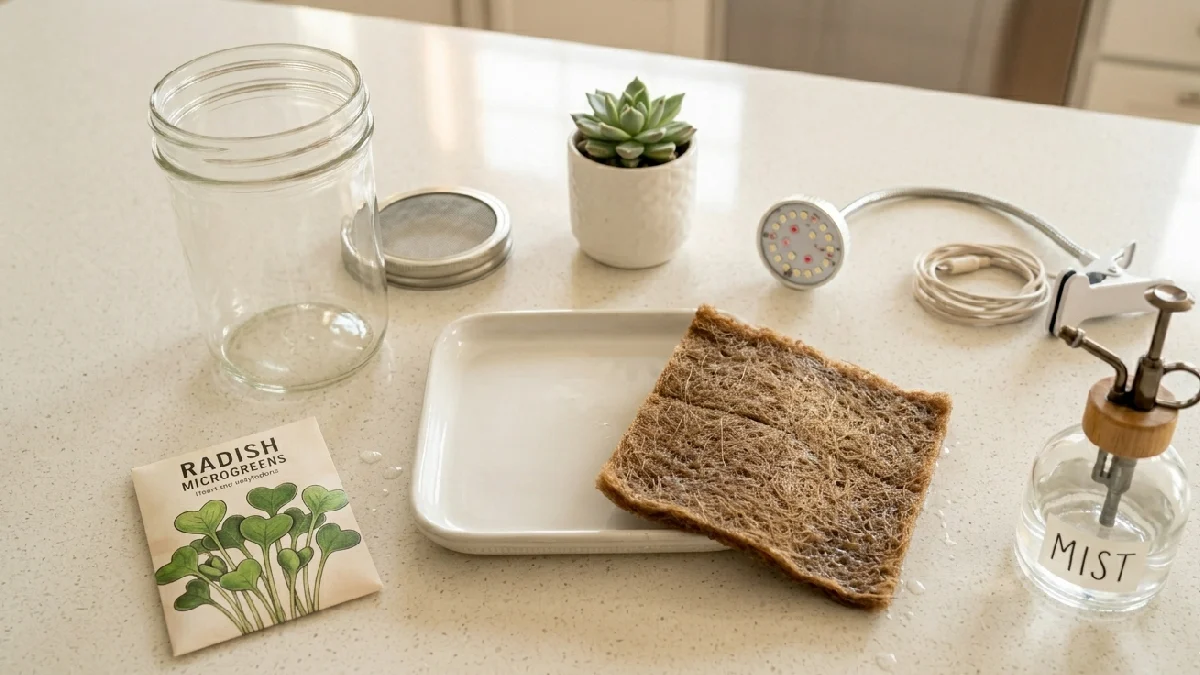
A spray bottle helped keep moisture balanced, not too wet, not too dry. Seeds matter a lot; fresh ones give better results every time. Beginners don’t need fancy equipment, just a simple setup in a kitchen corner. Small tools, steady care, and everything starts growing on its own.
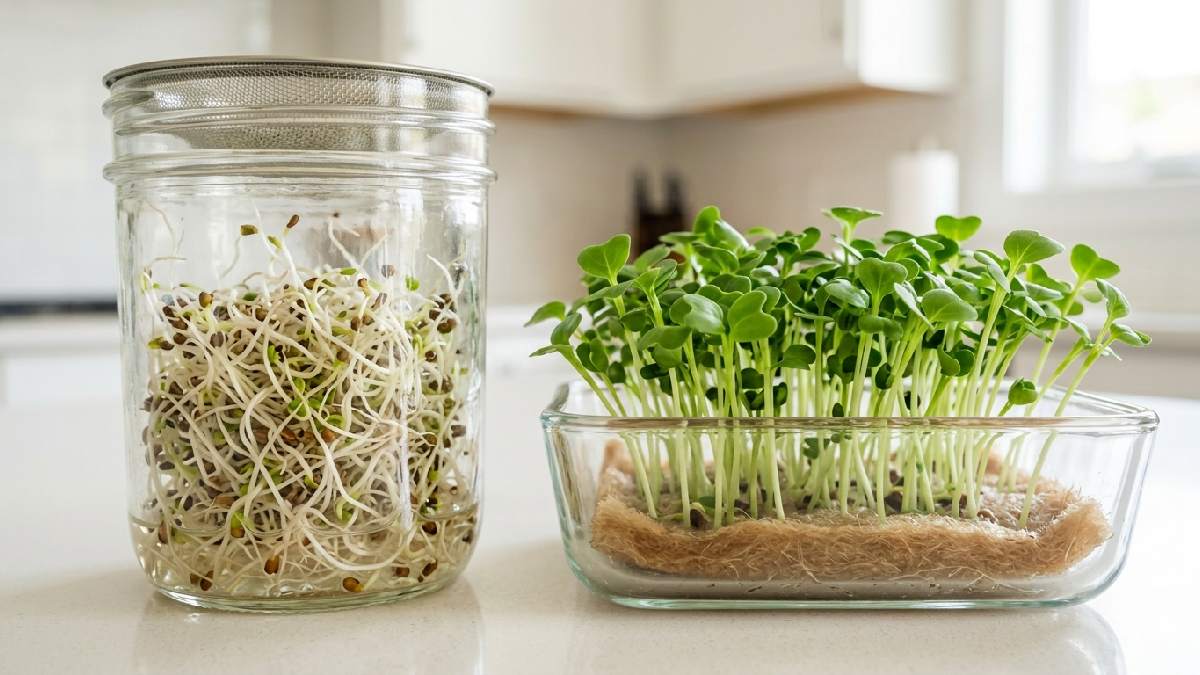
Tools for Growing Sprouts
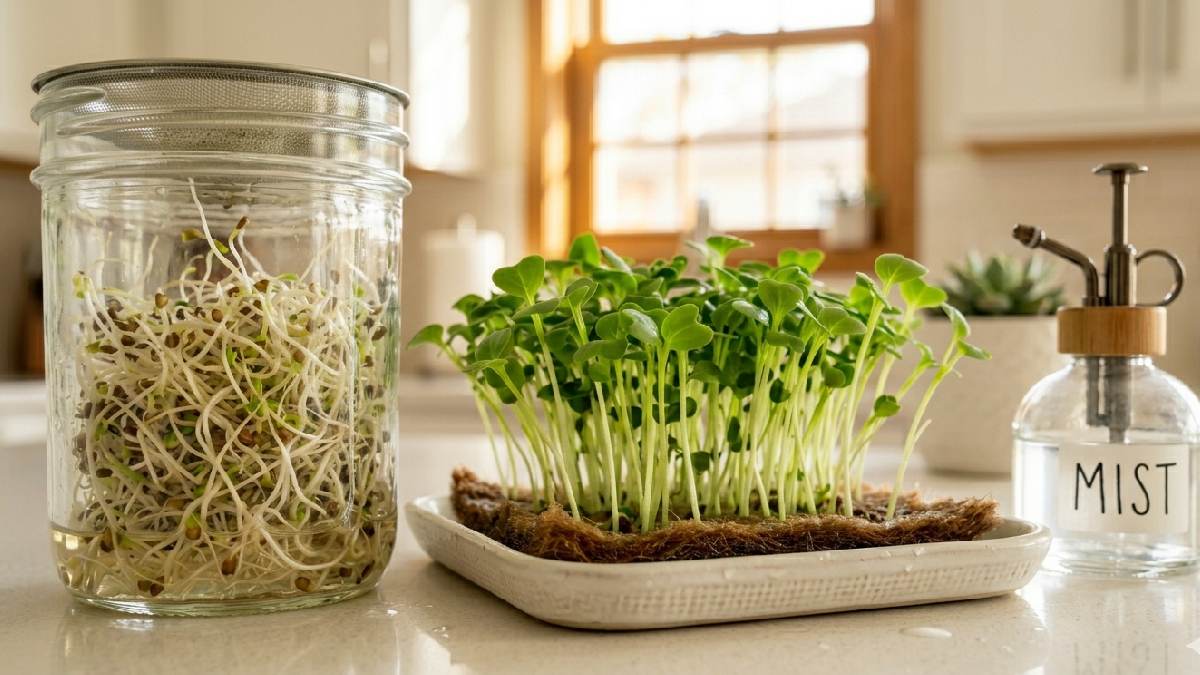
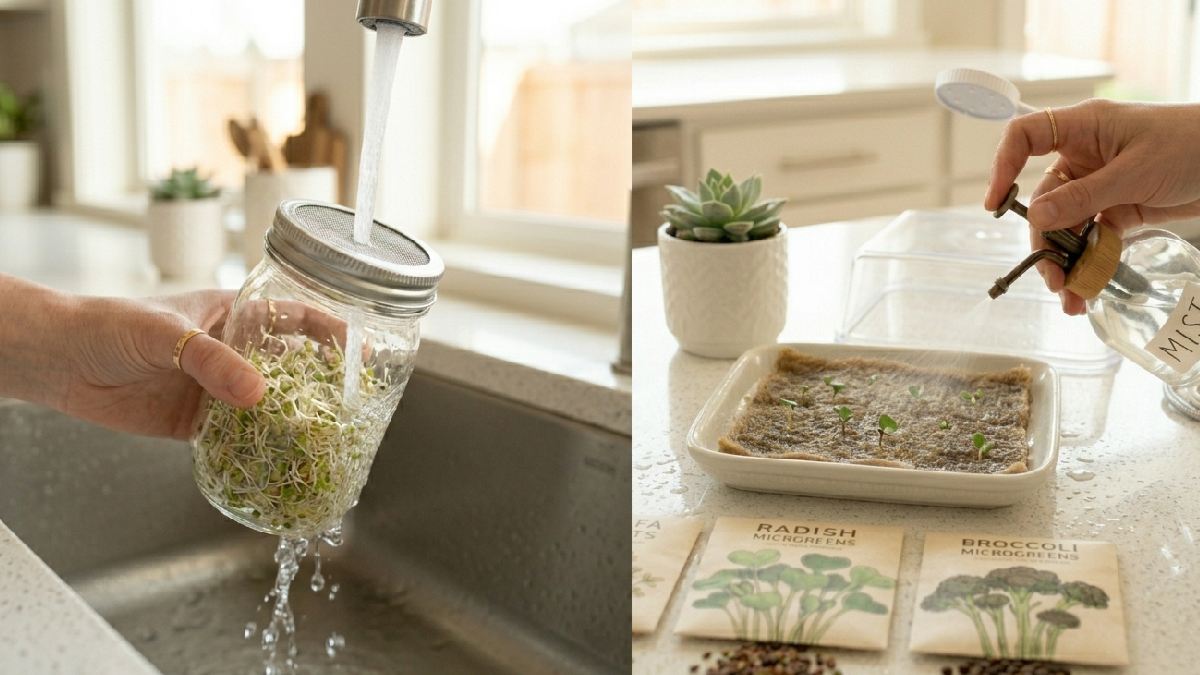
I started sprouts with just a simple glass jar, nothing special at all. A piece of breathable cloth or mesh lid keeps seeds in place. Clean water is the main thing; I change it daily without skipping. Seeds sit inside, I rinse them morning and evening sometimes. That’s pretty much the whole setup, very low effort.
No soil, no light needed in the early stage, just moisture working quietly. Beginners like this because tools are already available at home. Even a small kitchen corner is enough space for it. Simple setup, fast growth, easy results every time.
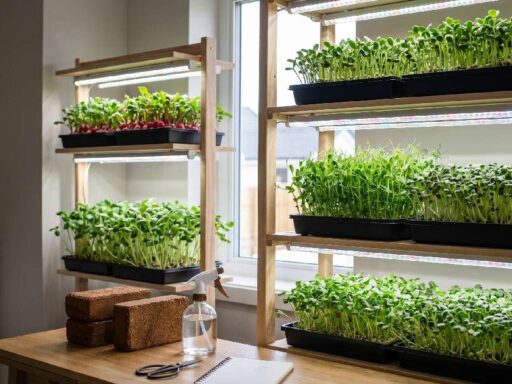
Tools for Growing Microgreens
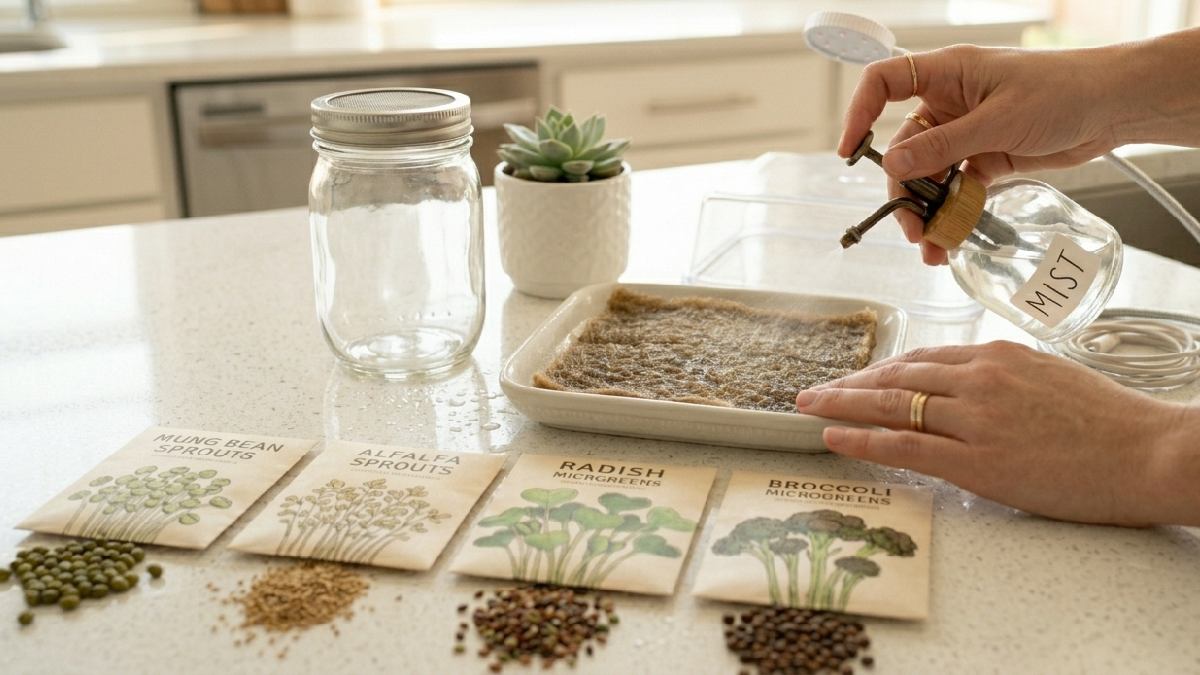
I usually start microgreens with a shallow tray, nothing fancy. A growing mat or thin soil layer goes inside, pressed gently so it sits evenly. Seeds spread on top, I try not to crowd them anymore after earlier mistakes. A spray bottle keeps moisture right, a light mist, not soaking wet.
Light source matters; I use a window sometimes or a small LED above the shelf. A cover helps in the first days, keeps humidity stable, and seeds calm. Beginners think setup is complex, but it’s actually very basic once you start. Everything fits in a small kitchen corner, simple tools doing steady work.
How to Grow Sprouts and Microgreens (Step, by, Step)
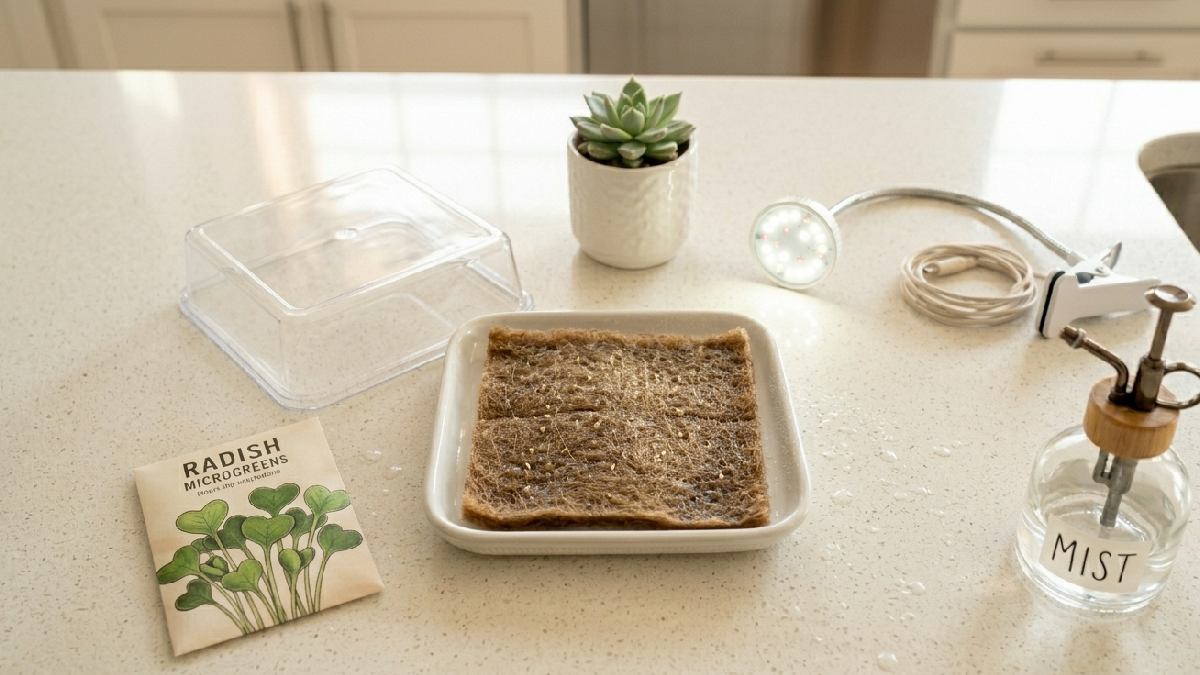
I usually start sprouts in a simple jar on my kitchen counter. Seeds go in, water is added, then I just let them sit for a few hours. After that, I rinse them morning and evening, a very regular habit now. Within a few days, tiny white roots start showing, then small shoots appear. For microgreens, I switch to a tray setup, a different feel but still simple.
I spread seeds on a moist mat or soil layer, not too thick. In the first days, I keep them covered; a dark and humid space helps germination. Then I move the tray into the light, the window, or the LED, and both work fine. I mist every day, just enough to keep the surface damp. In about a week or two, I harvest fresh greens straight from the tray.
Step 1: Choose the Right Seeds
I learned early that seeds decide everything. Some grow fast, some behave slowly and stubbornly. For sprouts, I pick simple ones like mung or alfalfa; they never disappoint. For microgreens, I go with radish or broccoli most times, easy and reliable. I once tried random old seeds; the results were weak and uneven, not worth it.
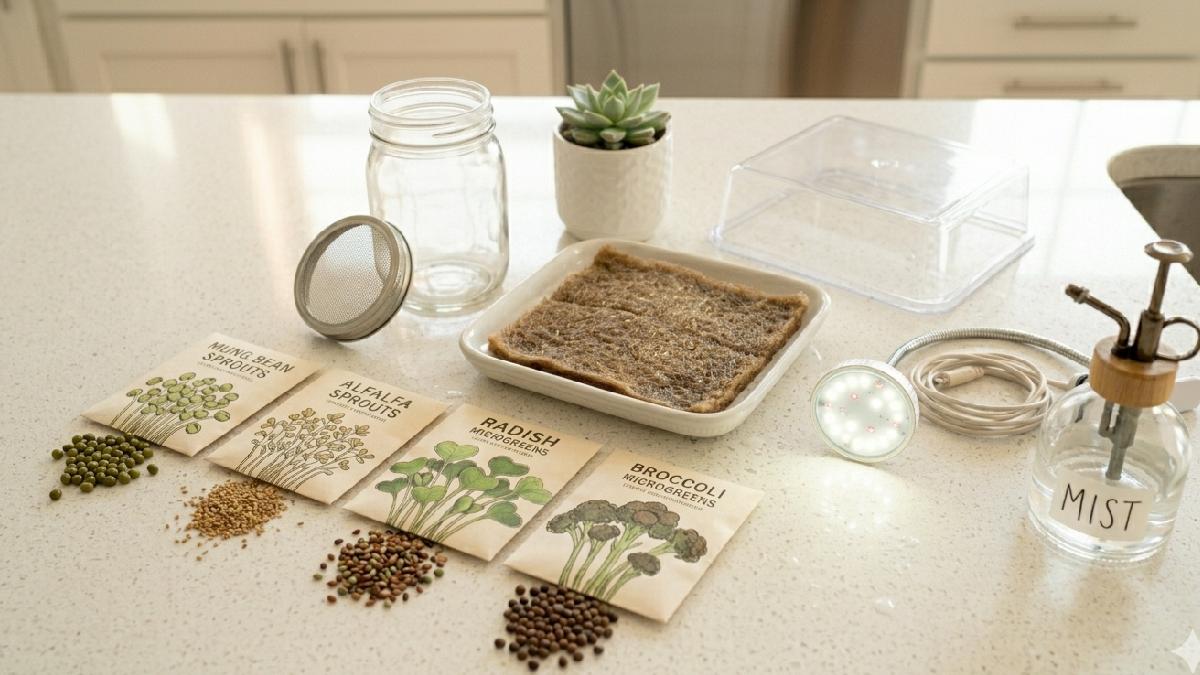
Fresh seeds always give cleaner growth. I noticed that clearly after a few trays. Beginners should not overthink varieties at the start; just pick two or three safe options. Good seeds mean less stress later, better sprouting, and healthier trays overall. A simple choice here saves many problems in the rest of the growing process.
Step 2: Prepare Your Setup
I clear a small space on my kitchen counter before starting anything. For sprouts, I keep a clean jar ready; nothing else is needed, really. For microgreens, I place a shallow tray and check if it sits flat. A growing mat goes inside, and I press it lightly so it settles. Water is added slowly, just enough to make the surface damp, not soaked.
I once rushed this step, the setup became uneven, and the growth looked weak later. Now I take a few extra minutes here, which makes the whole process smoother. Beginners often skip this part, but a clean setup always gives better results in the end.
Step 3: Water and Care Routine
I keep watering very simply now, nothing overcomplicated. For sprouts, I rinse them twice a day, morning and evening, same pattern most days. Water stays clean, seeds stay fresh, and no smell builds up. For microgreens, I just use a spray bottle with a light mist over the surface. Medium should stay damp, not wet.
I learned that after a few failed trays. I check them daily, and small observations become a habit quickly. Some days I overdo it, some days I forget a bit, plants still adjust. Beginners worry too much here, but consistency matters more than perfection. Slow care, steady routine, better growth overall in both systems.
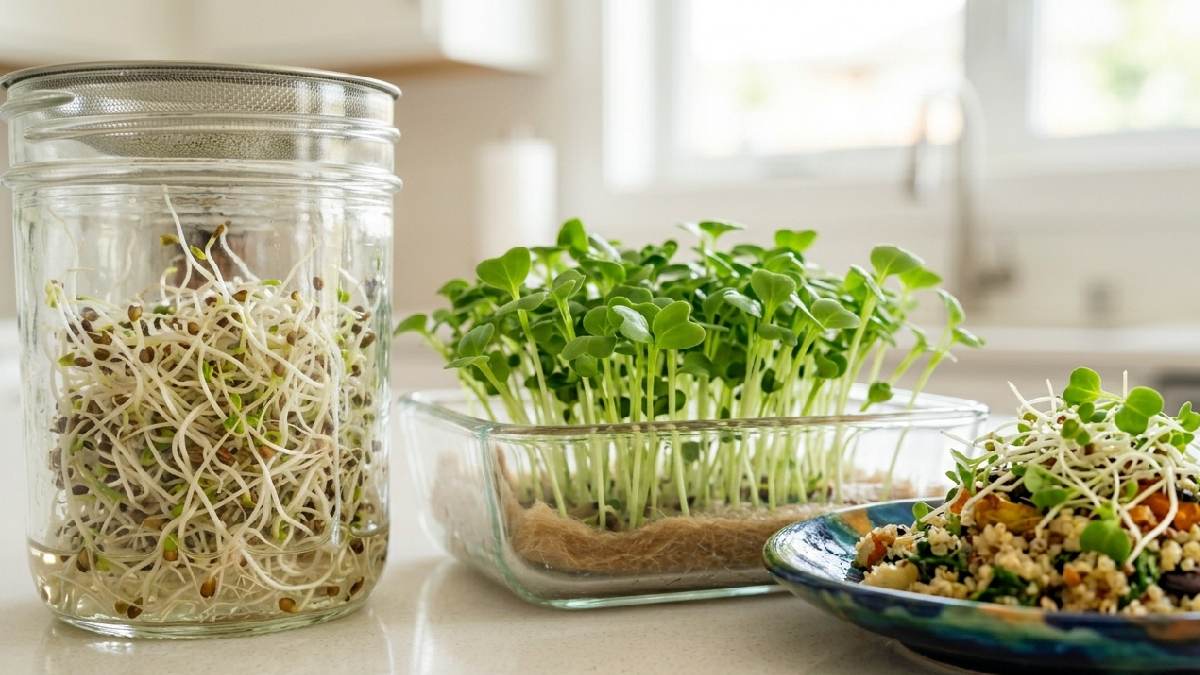
Step 4: Harvest at the Right Time
I usually check sprouts every day, the jar sitting right on the counter. Most of them are ready in two to five days, tiny tails showing, smell still fresh. I rinse once more before eating, a simple routine. Microgreens take longer, around seven to fourteen days.
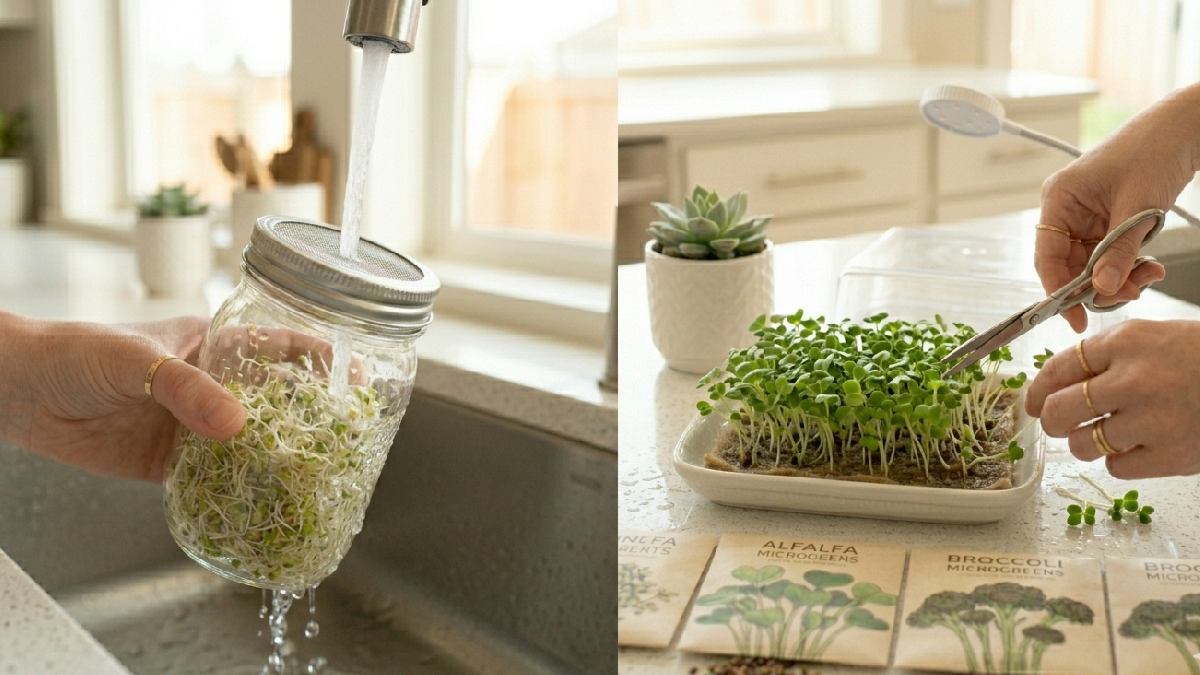
I look for the first true leaves, stems firm, color deep green. I cut above the soil with scissors, not pulling roots. If I wait too long, the flavor gets bitter; timing matters a lot here.
Best Seeds for Sprouts and Microgreens
I tried many seeds over time; some worked smoothly, some gave trouble. For sprouts, mung beans always feel safe; they grow fast and clean. Alfalfa is light, very easy for beginners, no stress at all. For microgreens, radish is my go-to, quick green with a strong flavor. Broccoli also behaves nicely, with steady growth every single time.
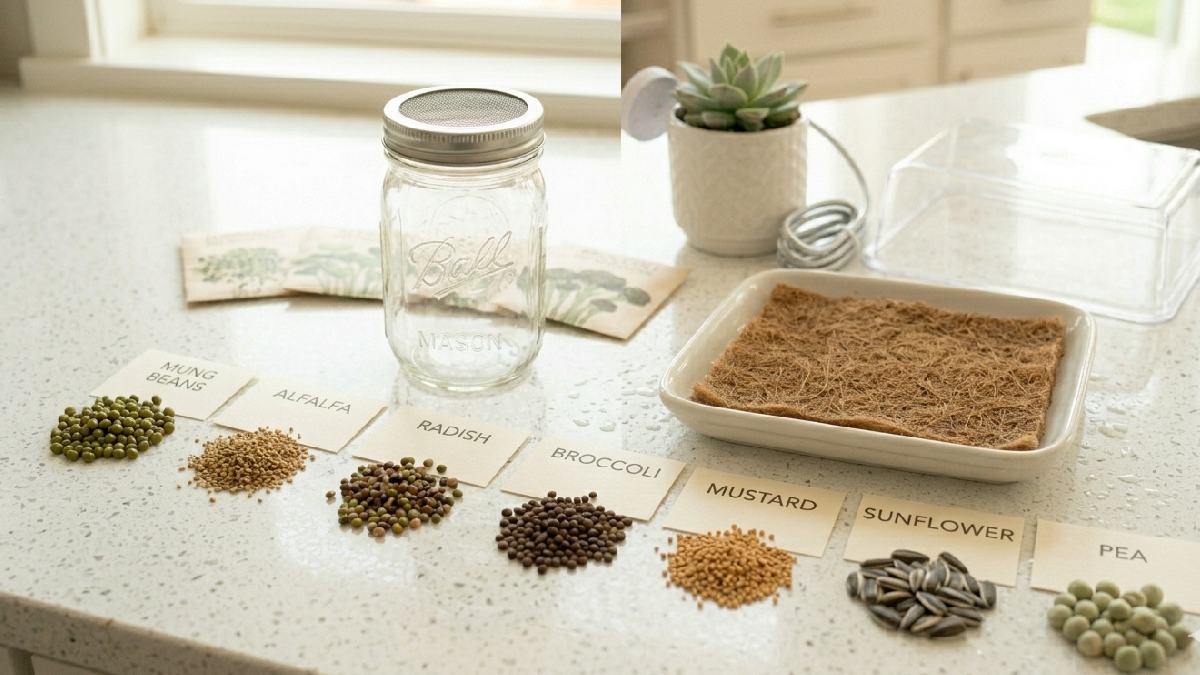
Mustard feels a bit wild, sharp taste, but fun to grow. Sunflowers give thick shoots, a heavy look, satisfying when harvested. Pea seeds take longer but suddenly explode in growth later. I avoid old or random seeds now; the results were uneven before. Fresh seeds always give better trays, a simple lesson learned slowly.
Easy Seeds for Beginners
I remember my first trays, I kept it very simple. Mung beans for sprouts, they never failed, always quick and clean. Alfalfa also felt easy, light taste, no stress at all. For microgreens, I started with radish, fast green shoots, very forgiving. Broccoli was next, slow but steady, no surprises, just calm growth.
I tried fancy seeds later, but beginners really don’t need that. Simple ones teach confidence first. Mistakes happen less when seeds are easy. Growth feels smooth, results come fast, and motivation stays high.
Fast, Growing Options
I always like seeds that don’t make me wait too long. Radish is the fastest I’ve seen; green shoots show up almost quickly. Mustard also grows fast, a bit wild, but fun to watch. For sprouts, mung beans are super quick, sometimes ready in just a couple of days. Alfalfa moves steadily but still fast enough for beginners.
I noticed fast seeds keep motivation high; you don’t lose interest. Slower ones are fine later, but starting quickly feels better. Mist lightly, keep light steady, results come fast. Kitchen corner stays active, always something growing.
Common Mistakes When Growing Sprouts and Microgreens
I made plenty of mistakes when I started; most beginners do the same thing. Overwatering was my biggest issue; jars smelled odd, trays got soggy. Sometimes I used too many seeds, and everything turned crowded and weak. Light mistakes also happen, sprouts stretch, and microgreens become pale and thin.
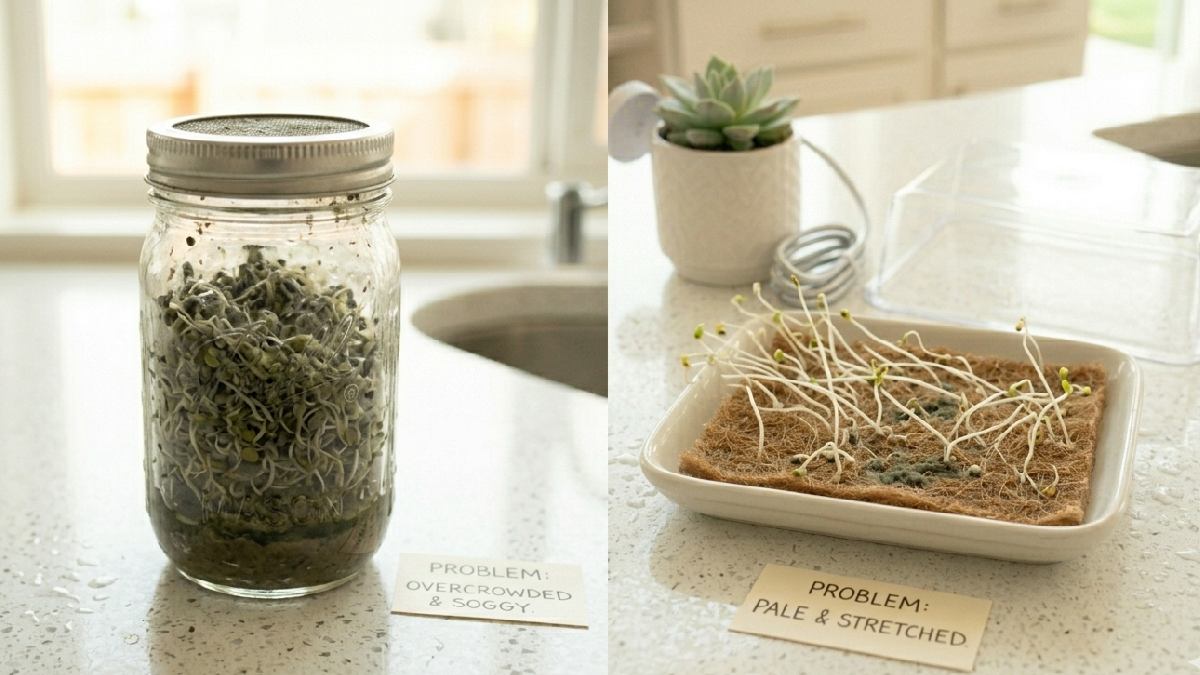
I ignored airflow once, and mold showed up fast, ruining a tray. Another mistake was using old seed; growth was uneven and slow. Beginners also rush harvest, pulling too early or waiting too long. Simple care fixes most problems; small changes matter a lot here. Growth gets better when you slow down and observe daily.
Overwatering
I overwatered my first few trays, thought more water meant better growth. It didn’t work like that. Sprouts in the jar started smelling odd, not fresh anymore. The microgreens trays stayed too wet, roots felt suffocated. Growth slowed down, and leaves looked weak and dull.
Sometimes mold appeared on the corners, which was frustrating to see. I realized plants don’t need constant soaking, just balanced moisture. Now I keep water light, check daily instead of guessing. Beginners usually make the same mistake, which feels harmless at first. Less water actually gives stronger, cleaner growth overall.
Poor Airflow
I ignored airflow in the beginning, thought it didn’t matter much. Trays stayed in one corner, air felt still and heavy. After a few days, too much moisture built up. Sprouts started smelling a bit off, not fresh anymore. Microgreens looked weak; some spots even showed mold.
That’s when I realized air movement is important. Now I keep a small fan nearby or open a window slightly. Nothing strong, just a gentle flow around trays. Plants stay cleaner, and growth feels more stable. Beginners miss this part often, but it makes a big difference.
Mold Problems
Mold showed up in my trays when I least expected it. Everything looked fine at first, then white fuzzy spots appeared on the surface. Smell changed too, kind of damp and stuck. I was overwatering without noticing it properly. The air was also still, no movement around the trays.
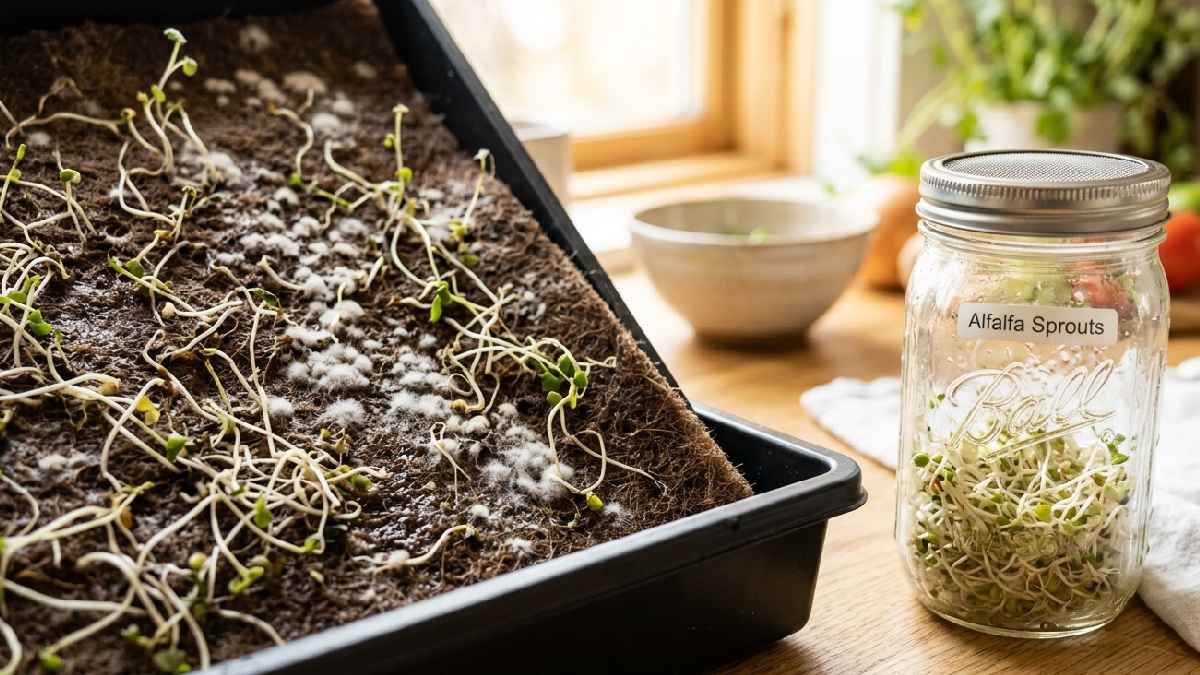
Sprouts in a jar felt slimy once; that one I had to throw away. Microgreens were affected when the mats stayed wet too long. I learned quickly that a clean setup matters more than anything else. Now I rinse everything properly and keep moisture balanced. Small care prevents big loss; the lesson came the hard way.
FAQs About Growing Sprouts and Microgreens
How long does it take to grow sprouts and microgreens?
Sprouts usually take 2to 5 days, with very fast growth. Microgreens take around 7to 14 days, depending on seed type. I check them daily, small changes show quickly, and harvest comes sooner than expected most times.
Can I grow sprouts and microgreens indoors?
Yes, both grow easily indoors. I use the kitchen counter or a small shelf space. Light from the window or the LED works fine. No garden needed, just a simple setup, water, and regular checking, very beginner-friendly.
Are they safe to eat daily?
Yes, they are generally safe when grown cleanly. I always rinse sprouts well and keep trays hygienic. Fresh harvest is best. If the setup is clean and water-controlled, eating daily feels normal and healthy.
Conclusion
Growing sprouts and microgreens at home is one of the easiest ways to add fresh, nutritious food to your diet. By following these simple steps on how to grow sprouts and microgreens, you can enjoy healthy greens in just a few days without needing much space or equipment.
Whether you are a beginner or just starting indoor gardening, this method is affordable, quick, and highly rewarding. Start small, stay consistent, and you’ll quickly build a habit of growing your own fresh food at home.