
How to Grow Microgreens Without Soil – A Complete Soilless Growing Guide
Microgreens are tiny plants. Seeds sprout, small stems, tiny leaves. Packed with flavor and nutrients. Fast-growing. Easy to eat. Great for salads, sandwiches, and smoothies. Quick results feel good.
Growing without soil is simple. No dirt on counters or shelves. No heavy soil bags. Water is controlled, less waste. Fewer pests are hiding. Trays stay clean. Cleanup is faster. Roots are visible. You see growth every day. Simple, neat, repeatable. Small mistakes fixable.
This guide is for home growers, urban gardeners, and beginners curious about indoor microgreens. Small apartment? Shelf or balcony works. No big investment needed. Just trays, mats, seeds, water, and light. Watch carefully. Adjust as you go. Learn with each batch.
Step by step, we’ll cover trays, mats, sowing seeds, germination, blackout phase, light exposure, watering, airflow, monitoring growth, and harvesting. Each step has its tricks. By the end, you’ll confidently grow soil-free microgreens at home. Fast, clean, indoor greens made simple and fun.
What Does “Without Soil” Really Mean?
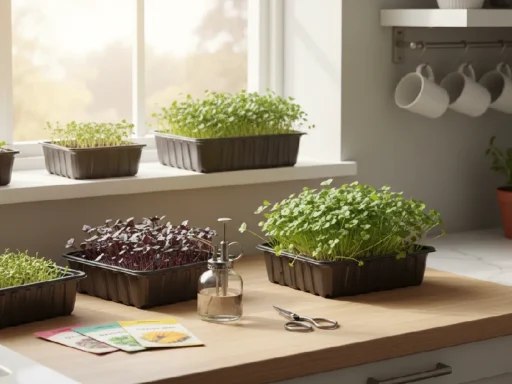
Growing microgreens without soil is simple but different. Seeds still need support and water, but no messy dirt. You use something else to hold them up. The most common ways are hydroponics, grow mats, or even paper towels. Each has its own vibe.
Hydroponics means trays with nutrient water. Roots dangle, absorb nutrients directly. Growth is fast, controlled, and healthy. But setup can cost more. Needs attention to water and nutrients.
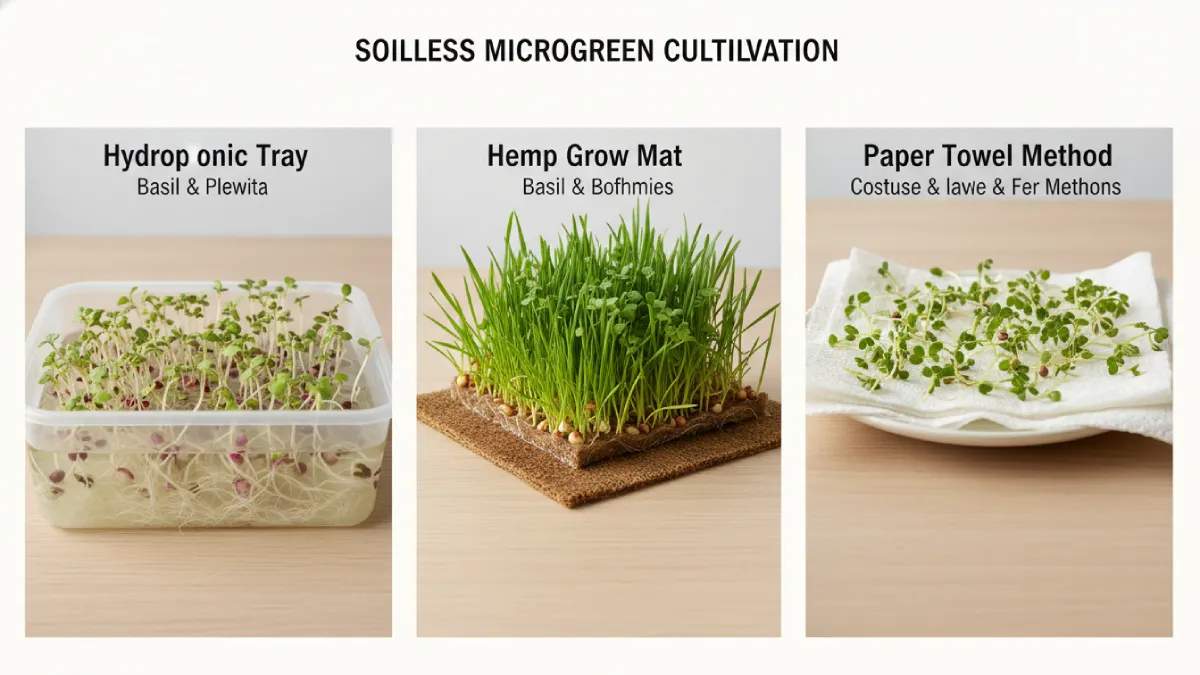
Soilless substrates like coco coir or hemp mats. Mats hold water, support roots, reusable. Less mess. Fewer pests. Beginners like them. You need to keep the mat damp, not soaked. Easy to see growth.
The paper towel method is DIY, tiny batches. Quick and cheap. You see roots right away. Cleanup easy. But not reusable. Dries fast. Small harvest.
- Hydroponic: Fast, controlled, expensive.
- Mats (coir/hemp): Moderate speed, reusable, beginner-friendly.
- Paper towel: Cheap, easy, small scale.
Pick one based on space, budget, and patience. Each works. Small mistakes fixable. Watch water. Watch roots. That’s the key.
Best Varieties of Microgreens to Grow Without Soil
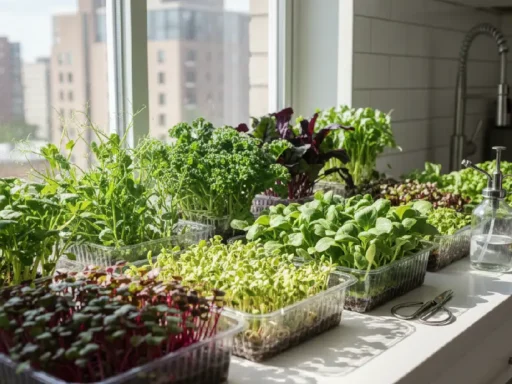
Not all microgreens like soil-free growing. Some are easy, some are tricky. Beginners start with fast ones. Quick sprouts. Strong stems. Easy to handle. Fast results motivate. Fast growers: radish, broccoli, mustard, arugula, kale. Radish fastest, 4–5 days. Broccoli similar. Mustard, arugula slower, 6–8 days. Kale takes longer still, 7–10 days. All do well on mats or hydro setups.
Seed size matters. Small seeds sprout fast, easy to manage. Large seeds like peas, sunflower, need support. Without soil, they can tip or dry fast. Mats or paper towels help hold them.

Very large seeds have limited success. Sunflowers only grow well on mats with water. Beginners avoid very big seeds until confident.
Tip: start first batch with radish or broccoli. Watch growth. Learn moisture control. Adjust spacing. Once comfortable, try mustard, kale, and arugula. Keep it simple. Observe. Adjust. Soil-free microgreens are easy if you follow these beginner-friendly varieties.
Step‑by‑Step Soilless Microgreens Growing Methods
Growing microgreens without soil feels simple. You pick a method. Hydroponics works. Roots hang in nutrient water. They drink. Plants react fast. Mats are next. Coco coir, hemp, jute. Seeds sit cozy. Roots breathe. Cleanup is easier. Some mats are reusable. Paper towels? Tiny, cheap, quick. Layer them. Spread seeds. Mist lightly.
Watch shoots pop. Each tray surprises. Some grow fast. Some slower. You check daily. Water is just right. Light matters. Small changes help a lot. Tips show up naturally. Mist over or under. Adjust distance. Soon green leaves peek. Kitchen corners look alive. Energy feels real.
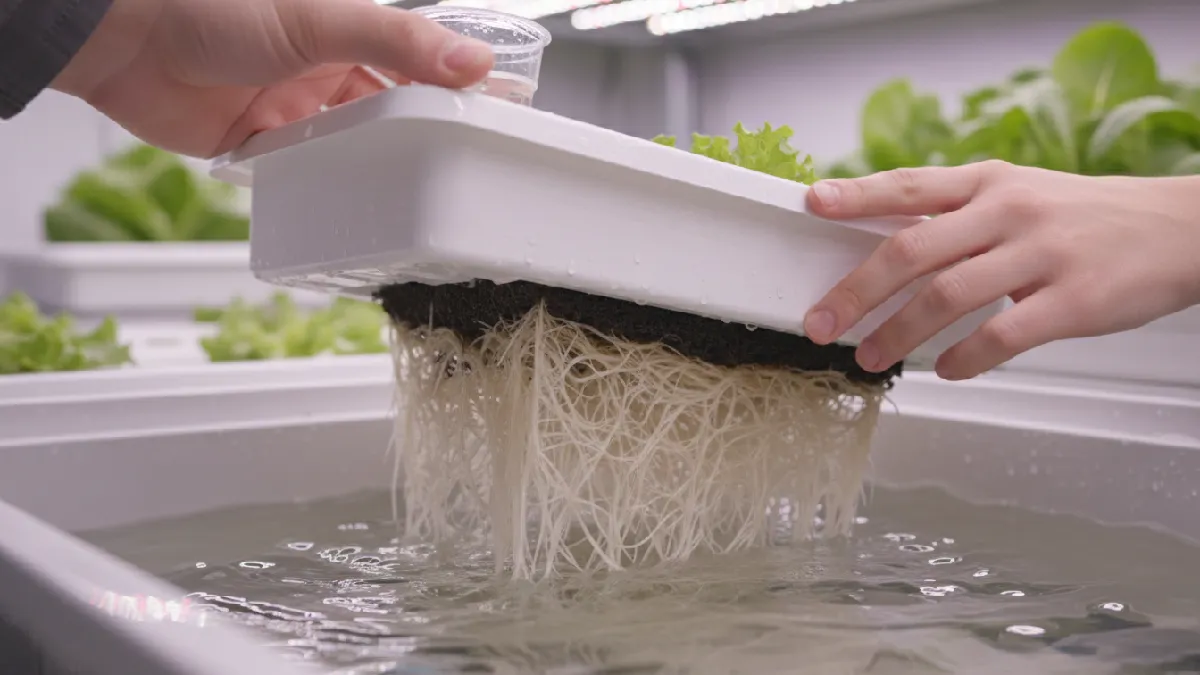
Method 1 — Hydroponic Microgreens (Most Efficient)
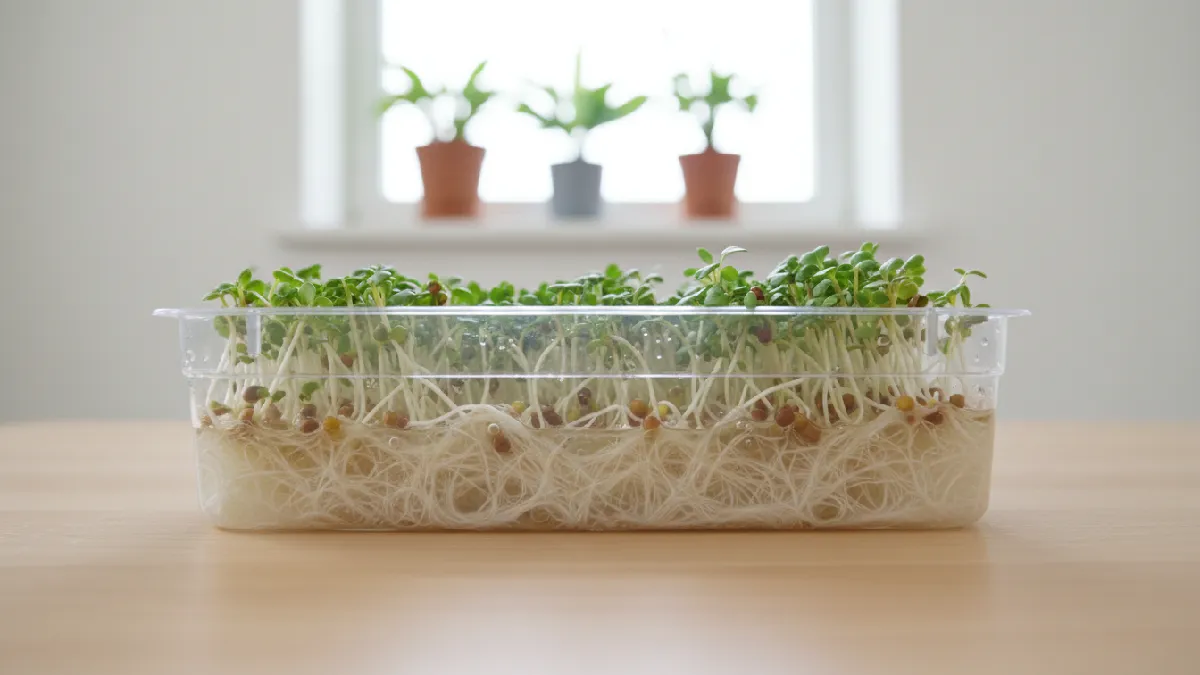
Hydroponics means growing microgreens without soil. Roots just hang in water full of nutrients. Plants drink directly. Growth is fast. Stems strong. Leaves healthy.

No dirt, no mess. You can see roots every day. Beginners feel motivated seeing fast results.
Step 1 – Gather Equipment
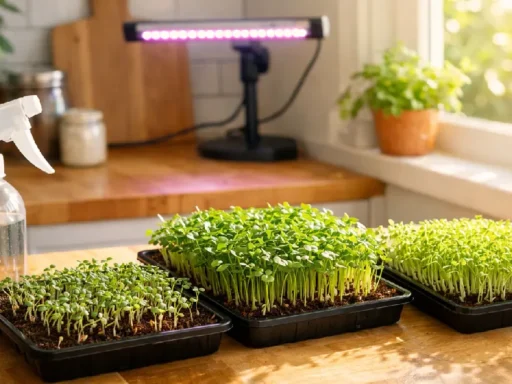
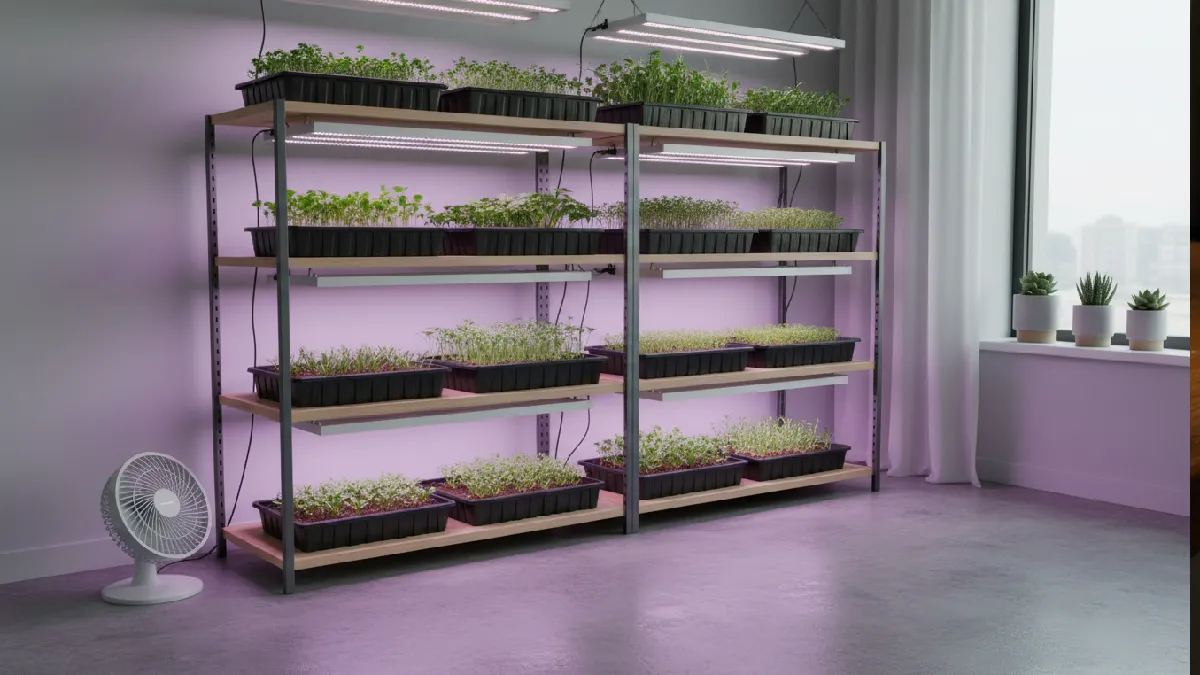
You need a top tray with holes, a bottom tray for water. LED grow lights. Small fan for airflow. Optional: pH meter, timer, thermometer. The top tray holds seeds. Bottom tray holds water and nutrients.
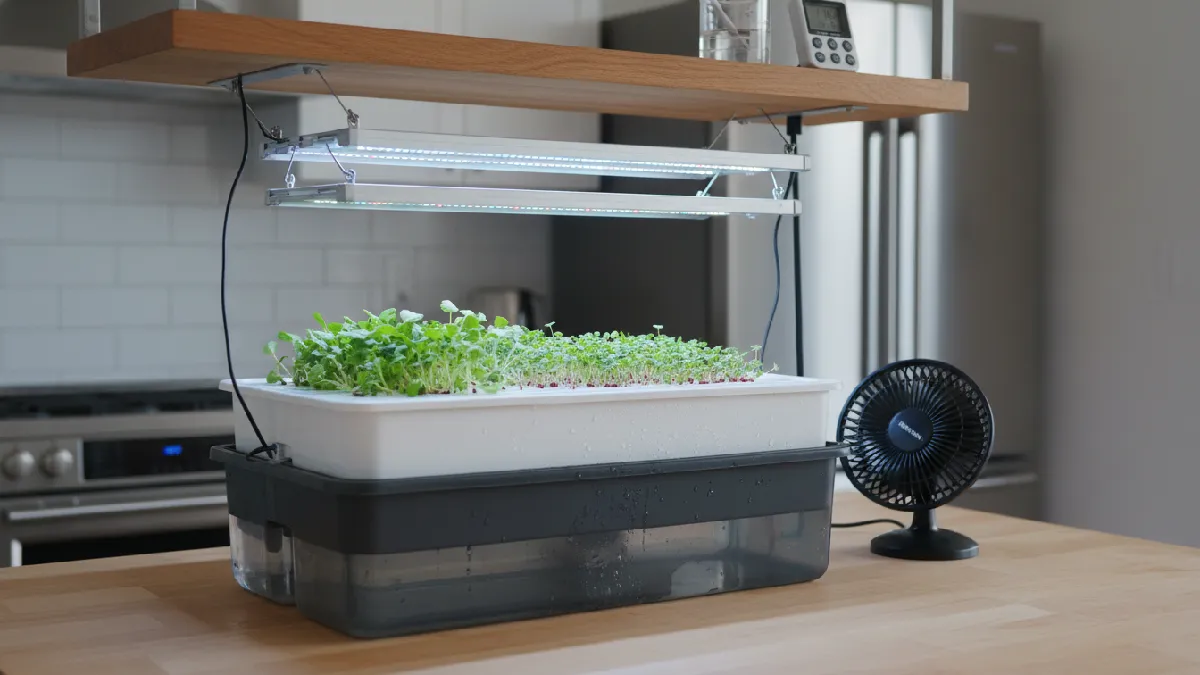
Lights replace the sun. Fan keeps stems strong and prevents mold. Beginners should start with one tray. Watch how water and nutrients behave first.
Step 2 – Mix Nutrient Solution
Follow instructions carefully. Mix the solution before putting it in the bottom tray. pH 5.5–6.5 is ideal. Roots absorb nutrients directly. Too strong burns the roots.
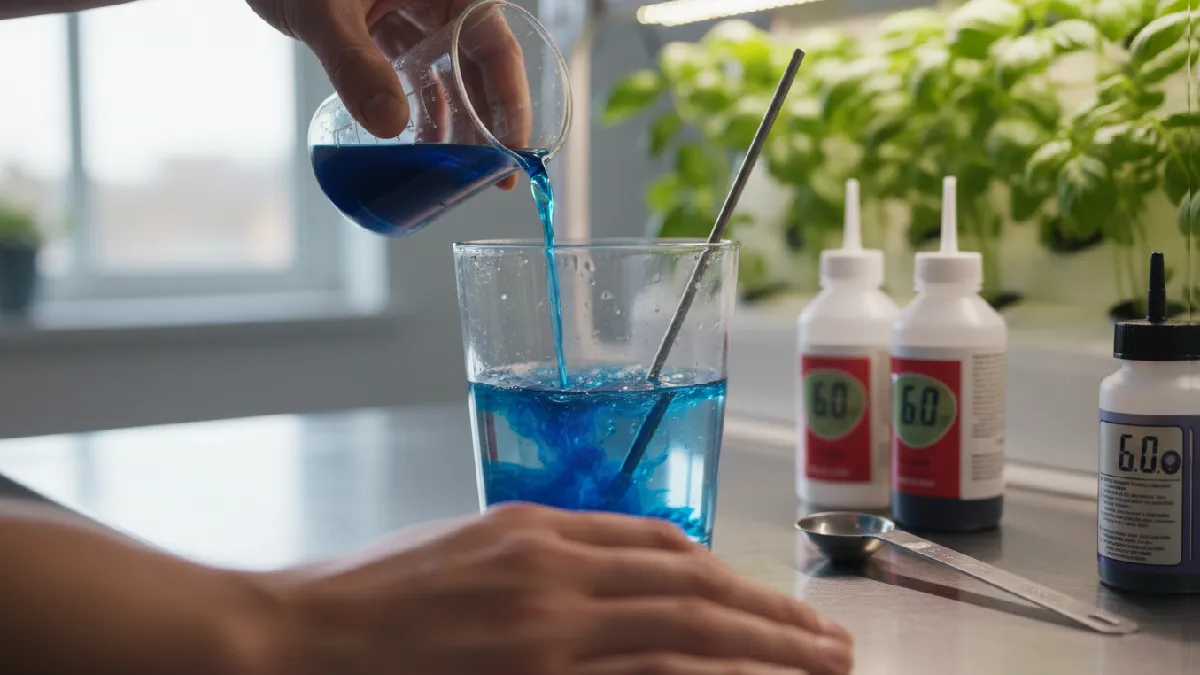
Too weak, slow growth. Wrong pH weak stems. Check daily. Small adjustments early help avoid big problems.
Step 3 – Prepare Trays
Place the top tray on the bottom tray. Add a solution so mat absorbs water, not flooded.
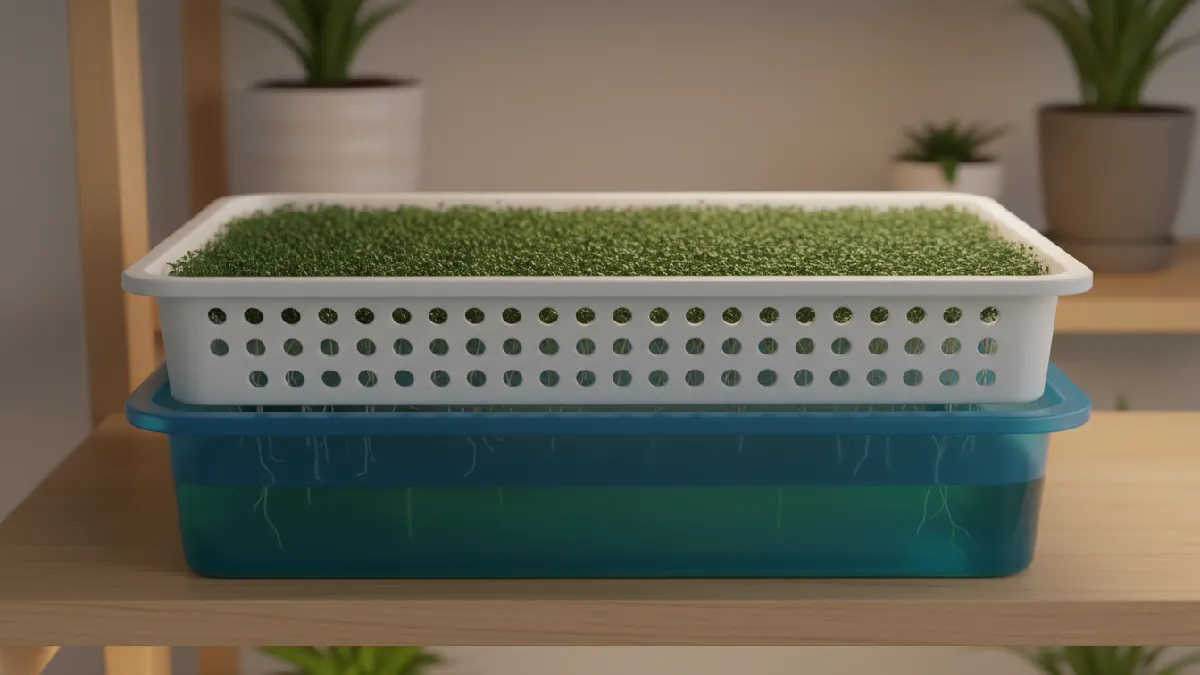
Seeds need even moisture. Too much mold. Too little slow germination. Check water daily. Refill before the mat dries.
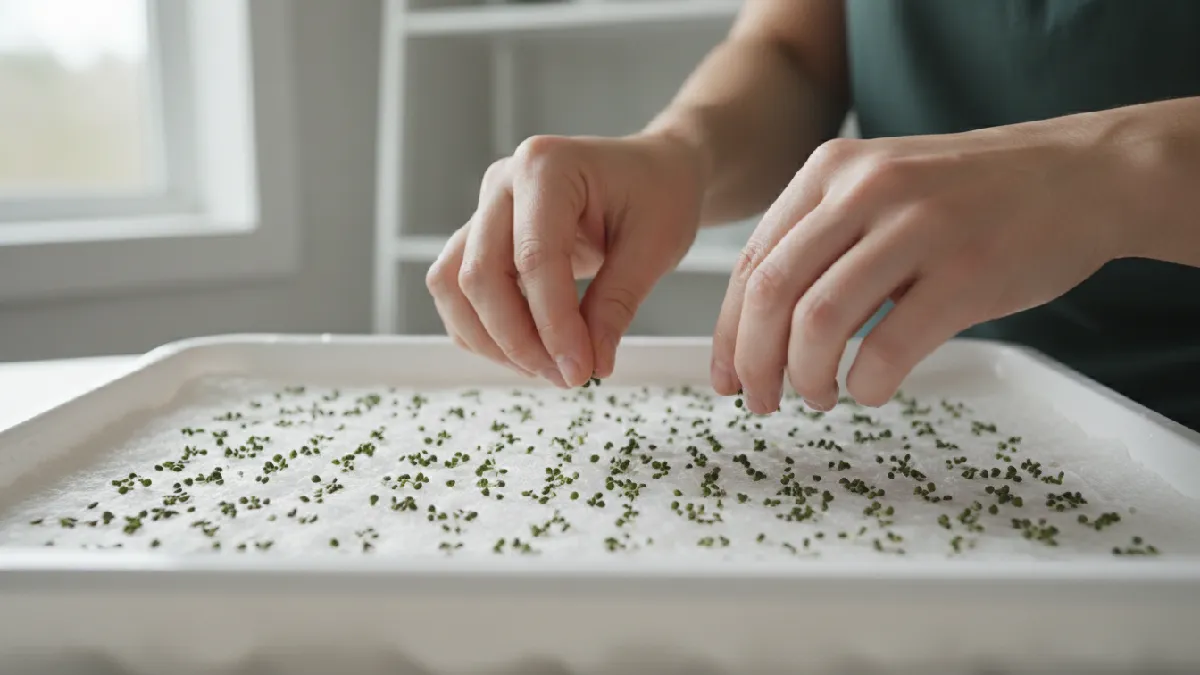
Step 4 – Sow Seeds
Spread seeds evenly. Press lightly. Avoid overcrowding. Crowded seeds compete for light and nutrients.
Large seeds like peas or sunflowers need support. Mats or paper towels help them stand upright.
Step 5 – Light & Airflow Setup
Lights 6–12 inches above shoots. 12–16 hours/day. Fan for airflow.
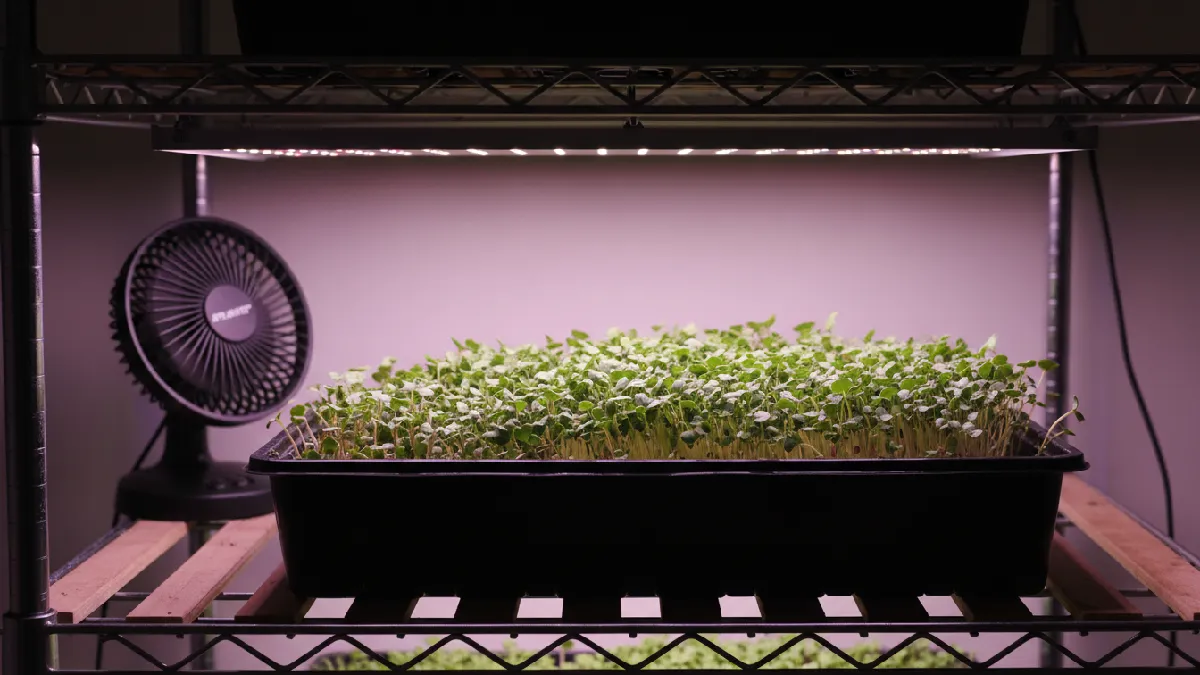
Light too far leggy shoots. No airflow, weak stems. Both are essential for strong, healthy growth.
Step 6 – Monitor Growth Daily
Check water, mat moisture, and roots. Adjust the lights and the fan.
Microgreens grow fast. Mistakes show quickly. Daily observation helps catch issues early.
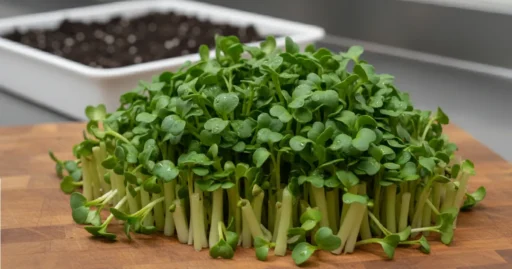
Step 7 – Harvest
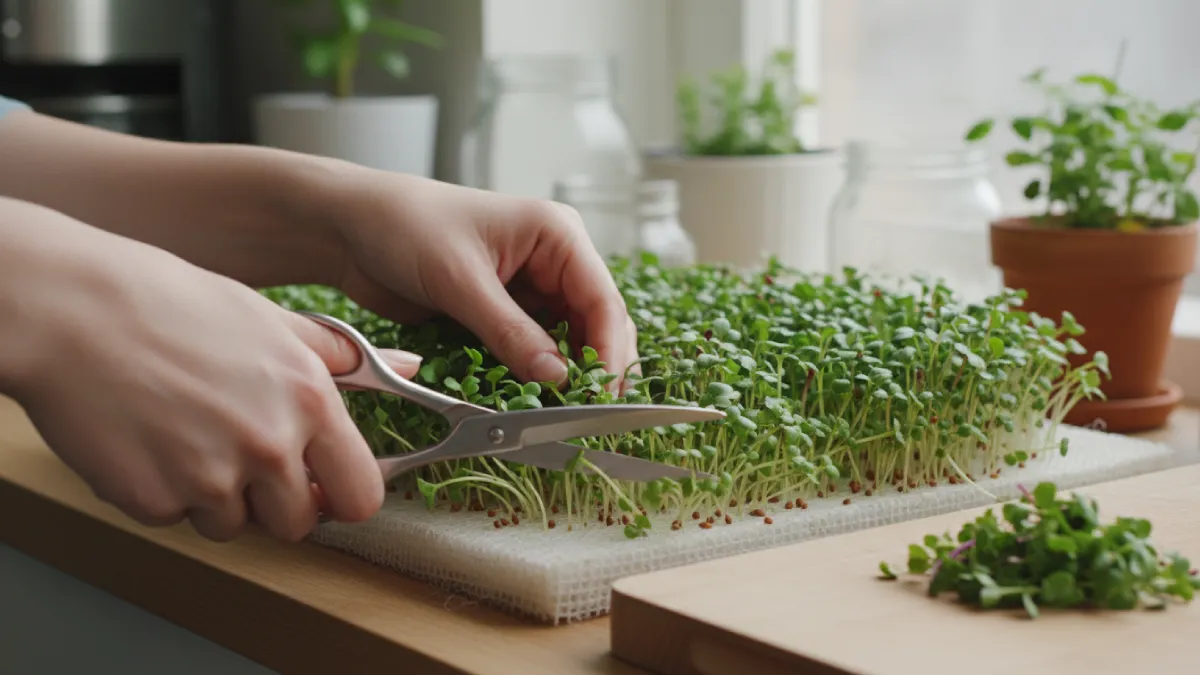
Ready in 7–10 days, depending on variety. Cut shoots above roots with scissors. Clean the tray for the next batch. Harvest at the right stage for the best flavor and nutrition. Sharp scissors recommended. Don’t pull shoots from roots.

Hydroponics is fast, clean, and efficient. Start small, one tray first. Keep the nutrient solution and pH correct. Observe daily, adjust fast. Beginners gain confidence quickly. Small mistakes fixable.
Method 2 — Grow Mats & Soilless Pads (DIY Friendly)
Grow mats like coco coir, hemp, or jute are super simple and beginner-friendly. They hold water naturally, support seeds, and allow roots to breathe. No soil, no mess. Setup is quick. Cleanup easy. Some mats can be reused if you rinse them carefully.
Cut the mat to fit your tray. The tray must be flat and clean. Place the mat evenly. Pre-soaking helps, especially with coir or hemp, so seeds get moisture right away. Keep the mat damp. Not too wet. Not dry. Seeds need contact but not drowning.
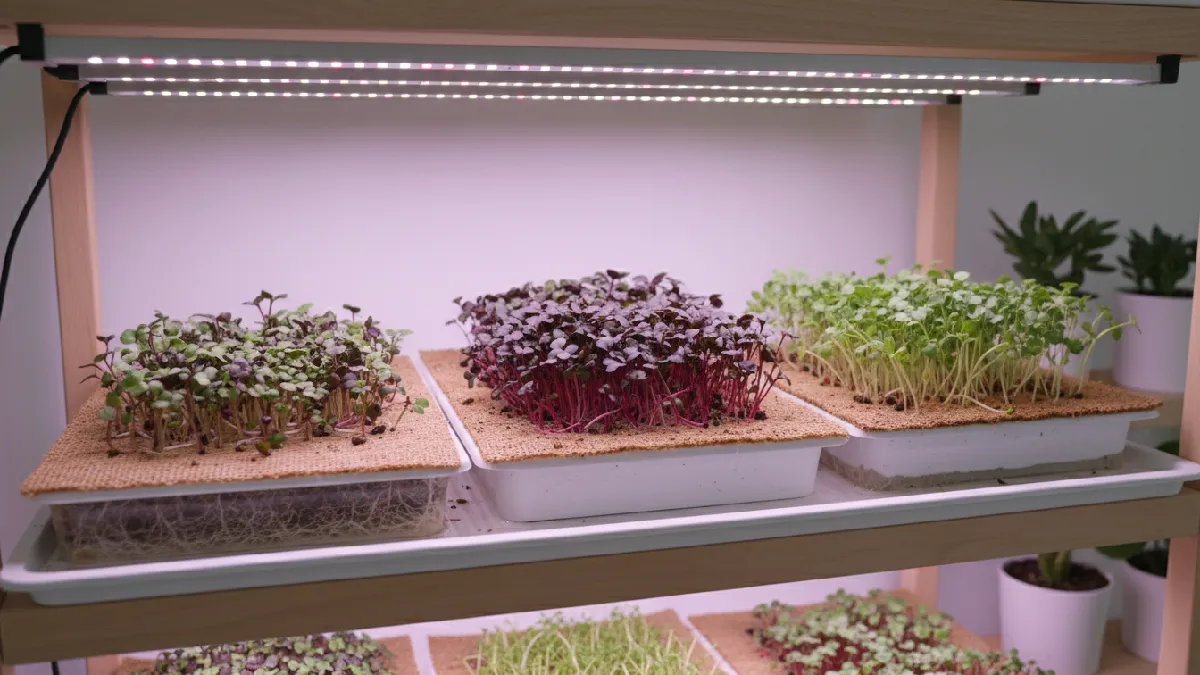
Spread seeds evenly. Press lightly. Avoid overcrowding. Every seed needs space. Check daily. Mist edges if dry. Lights 6–12 inches above. Fan for airflow. Airflow light, strong stems, healthy leaves. Mats are fast, clean, low mess. Pests less. Shoots ready in 7–10 days. Harvest gently, cut above the mat. Rinse the mat for reuse. Coir and hemp last longer than jute or paper mats. Some small mistakes are okay. Daily observation helps.
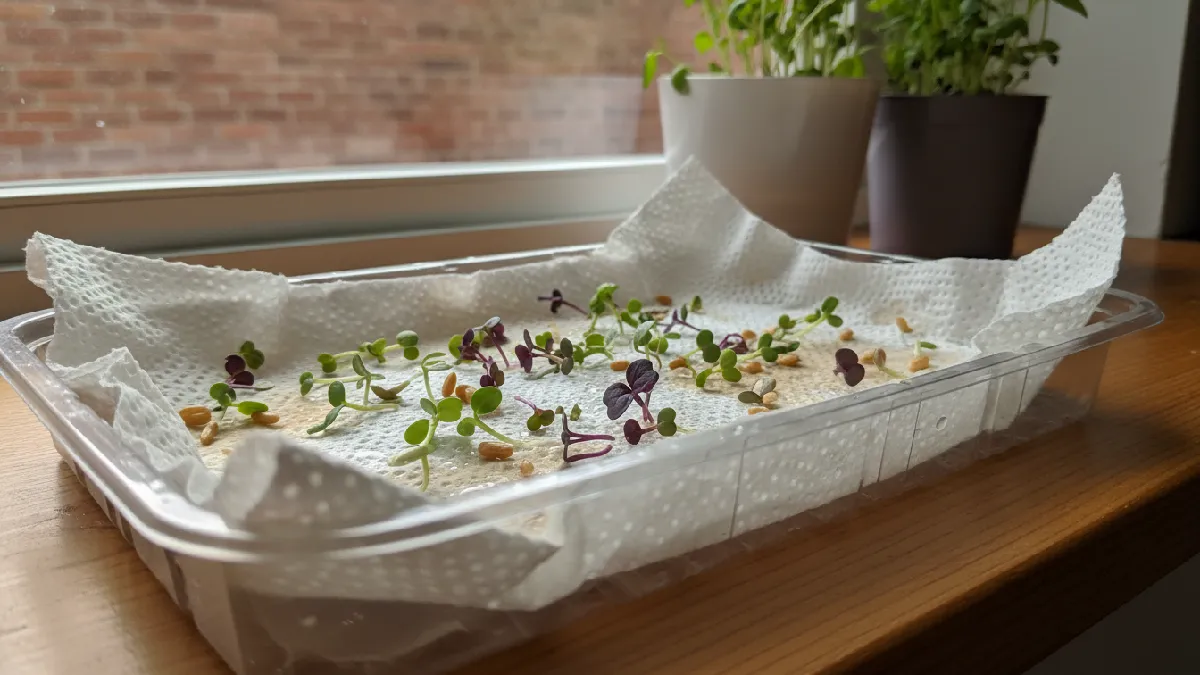
Method 3 — Paper Towel or Kitchen DIY (Budget Option)
Paper towels or clean cloths are maybe the simplest way to grow microgreens at home. No soil, no fancy mats, no expensive trays. Just take a shallow tray. Layer damp paper towels. Spread seeds evenly. Press lightly so seeds touch moisture. Keep towels slightly damp. Not too wet. Not dry.
This method is easy, but mistakes happen fast. Overwatering mold. Towels dry too quickly sometimes, so a daily check is important. Crowded seeds, uneven growth, or mold. Tiny mistakes show immediately. Tips to improve success: Use a tray with sides to hold water.
Cover lightly during germination to keep humidity. Remove cover once sprouts appear. Place the tray near the light, but avoid direct harsh sunlight. Gentle airflow helps prevent mold. Harvest shoots when 1–2 inches tall.
This method is perfect for small experiments, testing new seeds, or a quick indoor microgreens batch. Minimal cost. Fast cleanup. Small batches easier for beginners. Try different seeds and see what works.
Lighting & Environment for Soilless Microgreens
Light and environment make or break your microgreens. Sunlight is nice but tricky indoors. Windows don’t always give enough. LED grow lights work better. Place them 6–12 inches above the shoots. Keep lights on 12–16 hours a day. Too weak, leggy stems. Too close to burnt leaves.
Temperature matters too. 65–75°F (18–24°C) is best. Cooler slows growth. Hotter dries mats too fast. Airflow is key. A small fan keeps leaves strong, preventing mold.
Stagnant air, damp, weak sprouts, and mold risk are high. Mold is enemy number one. Don’t overcrowd seeds. Keep mats or trays evenly damp, not soaked. Check daily.
Spot any mold early. Remove it. Light, temperature, and airflow all together consistent growth, strong stems, healthy leaves. Small tweaks help. Move the trays a little. Rotate them. Adjust fan direction. Watch daily. Microgreens are delicate. Tiny changes make big differences.
Watering & Nutrient Basics (Without Soil)
Watering and nutrients are key when growing microgreens without soil. Hydroponics works because roots get everything from water. Nutrient solution is simple; follow the instructions carefully. Not too strong, not too weak.
Water quality matters. Tap water sometimes works. Filtered water is better. pH should stay around 5.5–6.5. Too high or too low weak growth. Check daily if you can.
How often to water? Depends on the mat or tray. Mats dry faster, so daily misting might be needed. Trays with water at the bottom for bottom watering work best.
The solution rises into the mat or soil-free substrate. Keep it moist. Not soaking, not dry.
Bottom watering vs misting: Bottom watering gives consistent moisture. Misting helps with the small tray or the paper towel method. Avoid overwatering. Overwatered microgreens mould.
Small tweaks matter. Check the water level every day. Adjust the nutrient solution weekly. Watch roots. Healthy roots, healthy shoots. Tiny changes now, big differences later.
Troubleshooting – Common Issues (User Intent Driven)
Problems show up fast when growing microgreens without soil. That’s normal. Most issues come from water, air, or light being slightly off. Mould is the most common one. It usually appears when seeds are overcrowded or when moisture stays too high for too long. Wet mats, no airflow, warm rooms. That mix invites mould. Reduce water. Add airflow. Space seeds better next time.
Leggy microgreens are another issue. Long, thin stems that fall over. This happens when the light is too weak or too far away. Move the lights closer. Increase light hours. Styes usually fix themselves within a day or two.
Slow growth confuses many beginners. Often, the temperature is low, or nutrients are missing. Cold rooms slow everything down. A nutrient solution too weak also causes pale, tired-looking greens. Adjust slowly. No sudden changes.
A bad smell means the water has been sitting too long. Stale water causes root stress. Replace solution. Clean trays. Start fresh if needed. Most problems are small and fixable. Watch daily. Change one thing at a time. Microgreens respond fast when conditions improve.
When and How to Harvest & Store Microgreens
Harvesting microgreens is not something you rush. Many beginners do that. They see the green colour and cut everything. That usually ruins taste and texture. Microgreens are best when the first true leaves appear. Not the tiny baby leaves, but the next ones. At that point, the stems feel stronger, and the flavour is clearer.
Cutting should be slow and clean. Don’t pull plants out. Pulling makes a mess. It damages the rest of the tray too. Always use scissors. Normal kitchen scissors are fine; just clean them first. Cut slightly above the mat or surface. No need to go deep. You are not digging. Just a simple cut.
Washing is optional. If your setup is clean, washing is not required right away. Water sitting on leaves causes problems later. Microgreens hate extra moisture. If you decide to wash, do it quickly. Cold water only. No soaking. Shake gently. Let them dry fully. Even a little water can reduce shelf life.
Storage is where most people fail. They pack too tightly. Or they seal containers completely. That traps moisture. Instead, use a loose container. Add a dry paper towel inside. It helps with moisture. Put the container in the fridge, but not near the freezer section. Too much cold damages leaves.
Most microgreens stay fresh for about a week. Some last less. Some last longer. That depends on variety and care. Clean trays, clean hands, and patience matter more than any trick.
FAQs – Microgreens Without Soil (Real Answers)
Can microgreens grow without any growing medium at all?
Yes, they can. But honestly, it’s not that easy. Some people use mesh trays where seeds sit on top and roots dangle straight into water. If the timing is perfect, they grow fine. Miss a watering, and the roots dry out fast. For home growers, this method is tricky. That’s why most people use thin grow mats. Gives roots support and reduces failure chances.
Do I need nutrients for hydroponic microgreens?
Usually, no. Seeds already carry energy inside. That’s enough for the first growth until true leaves appear. Plain, clean water works in most cases. Nutrients are optional after true leaves. Beginners sometimes add nutrients too early, then stems get weak, taste suffers, or mould appears. Water alone is safer and simpler.
Are soil-free microgreens safe to eat?
Yes, totally safe if hygiene is followed. Trays should be clean. Water should be fresh. Airflow should be good. Soil-free is actually cleaner in many cases. After harvest, washing is optional. If you wash, do it gently and dry leaves well. Wet microgreens in the fridge spoil quickly.
Why do microgreens get mould even without soil?
Mould is not about soil. It’s about moisture and still air. Too much water, high humidity, or covering trays for too long causes mould. Many beginners overmistake. A small fan or light airflow usually fixes the problem. Once the air starts moving, mould often stops appearing on its own.
Conclusion
Alright, so growing microgreens without soil. It’s not that hard. Really. You’ve seen hydroponics, grow mats, and paper towels. All of them work. Some faster, some slower. Every seed behaves a little differently. Every tray reacts differently, too. You just watch, adjust, and learn as you go.
Don’t stress if a tray fails. It happens. Microgreens forgive mistakes. Move trays, check the water, and change the light a little. Tiny tweaks make a huge difference. Even small errors teach you more than you think.
Try different seeds, try setups. Watch what works in your space. Kitchen, balcony, room, each spot is unique. Experimentation is key. Start small. Keep a little journal if you want. Check daily. Learn daily.
And yeah, check other guides too: indoor lights, tray setups, and soil-free nutrients. Everyone finds their own rhythm. Do it your way. Soon, fresh microgreens anytime at home. Simple, easy, rewarding, and fun.