Microgreens Growing Trays – Complete Beginner & Pro Guide
Microgreens growing trays are where the entire process really begins. Seeds and lights matter, sure, but the tray sets the tone. I learned that the hard way. I once used a deep, cheap tray with no drainage. Water sat at the bottom. Roots struggled. The crop looked weak and uneven. That mistake made one thing clear. A tray is not just a container. It is part of the growing system.
The right tray helps maintain balanced moisture and steady airflow around the roots. Microgreens grow evenly when excess water can escape. With the wrong tray, seeds rot or patches grow faster than others. Beginners often overlook this step. Experienced growers rarely do.
This guide walks you through everything that matters. Different tray types and common sizes. Shallow versus deep options. Why do drainage holes change growth results? Material choices like reusable and food-grade plastic. You will also see how to set trays up properly for indoor racks or small home spaces. A strong harvest always starts with the right base.
What Are Microgreens Growing Trays?
The word tray sounds simple, almost boring. In microgreens growing, it isn’t. It’s the surface where seeds wake up, roots spread, and mistakes show very fast. A microgreens growing tray is a shallow container used to hold the growing medium and seeds during those first intense days. Nothing fancy. Just practical. But it quietly controls how the whole crop behaves.
The tray’s main job is to manage water and air. Seeds need moisture, not puddles. Roots need air, not depth. A good tray helps with that balance without you thinking too much about it. Water drains when it should. The surface stays evenly damp. Growth looks calm, not stressed. When trays are wrong, you notice it. Yellow patches. Uneven height. Sometimes a smell you don’t want indoors.
People often compare trays with normal household containers. Food boxes. Baking pans. Random plastic tubs. They seem fine at first. Then the problems start. Most are too deep or completely sealed.
Water has nowhere to go. Airflow drops. Mold finds its chance. Dedicated microgreens trays are built with these issues in mind. Shallow walls. Simple shape. Drainage that actually works.
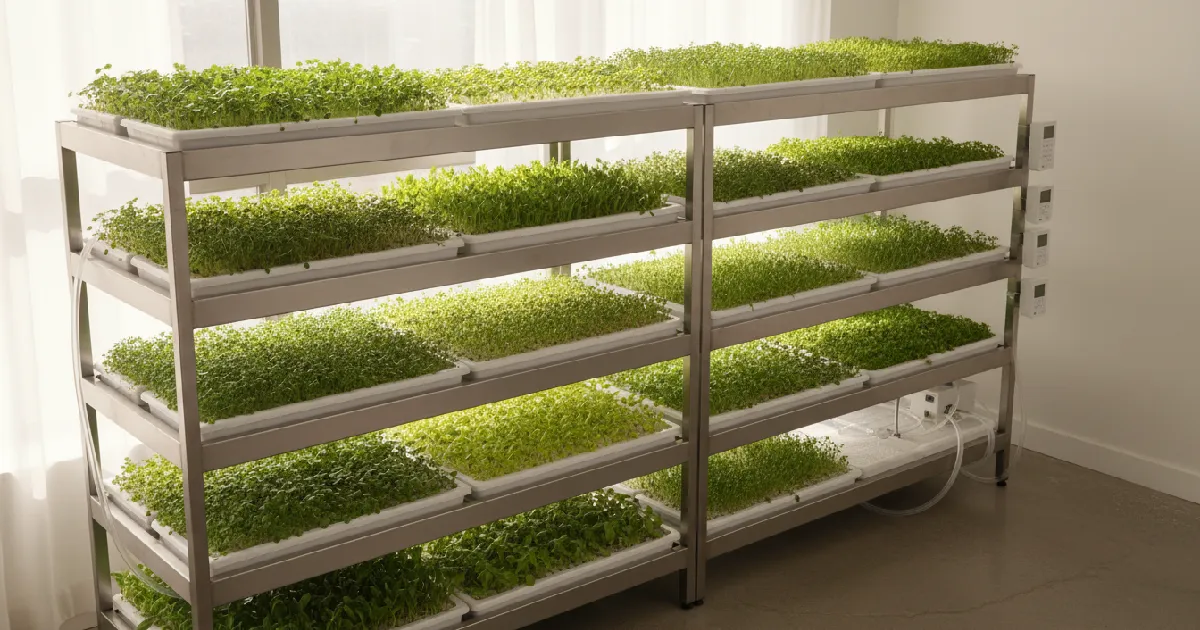
Indoor growing makes trays even more important. Indoors, everything is controlled but limited. Air doesn’t move much. Light comes from one direction. Trays help keep things predictable. They sit well on racks. Watering stays clean, especially from the bottom. You don’t disturb seeds every time your hand moves.
For beginners, trays reduce chaos. You focus on learning, not fixing problems. For experienced growers, trays mean repeatable results. Same setup. Same harvest rhythm. Microgreens reward simplicity. A proper tray is part of that quiet system doing its job in the background.
Why Choosing the Right Microgreens Tray Matters
Root Development
Choosing the right microgreens tray might seem small, but it can change everything. Roots start first. If the tray is too deep or shallow, roots don’t spread evenly. They get tangled or stay cramped. Uneven roots mean uneven growth. Plants struggle to reach light at the same time. A proper tray gives roots space to breathe, so every seed has a fair start.
Water Management
Water is tricky. Too much or too little can ruin a crop fast. A tray with good drainage helps water stay at just the right level. Roots get moisture without drowning. You avoid soggy patches, dry edges, or sudden wilting. Even watering makes plants grow stronger and healthier.
Mold Prevention
Mold is another silent enemy. Indoors, limited airflow plus wet surfaces are a perfect setup for mold. The right tray keeps water from sitting at the bottom and lets air move. Less mold, less stress, less wasted seeds. Beginners often learn this the hard way. Experienced growers swear by proper trays for consistent results.
Yield & Uniform Growth
Yield also depends on the tray. Uneven growth means some plants overtake others. Good trays promote uniform height and density. When it’s harvest time, you get a clean, even crop ready to use or sell.
Long-term Cost Saving
Long-term cost is surprising. Cheap or wrong trays may save money at first. But repeated failures, wasted seeds, and low-quality harvests cost more over time. A decent tray lasts for multiple cycles, keeps plants healthy, and reduces extra effort.
Types of Microgreens Growing Trays
Trays aren’t just containers. They decide how seeds grow, how roots spread, and how easy harvesting is. The right tray makes life simple. The wrong one can ruin a crop. Here’s a look at the main types and what they do best.
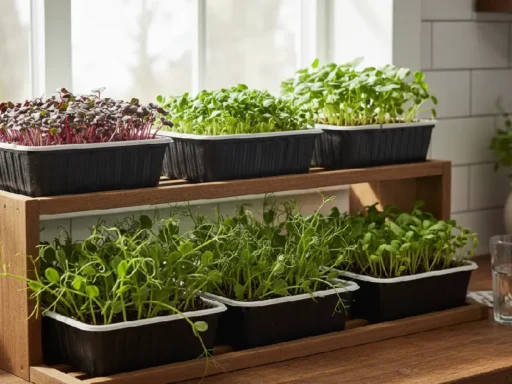
Standard Plastic Microgreens Trays
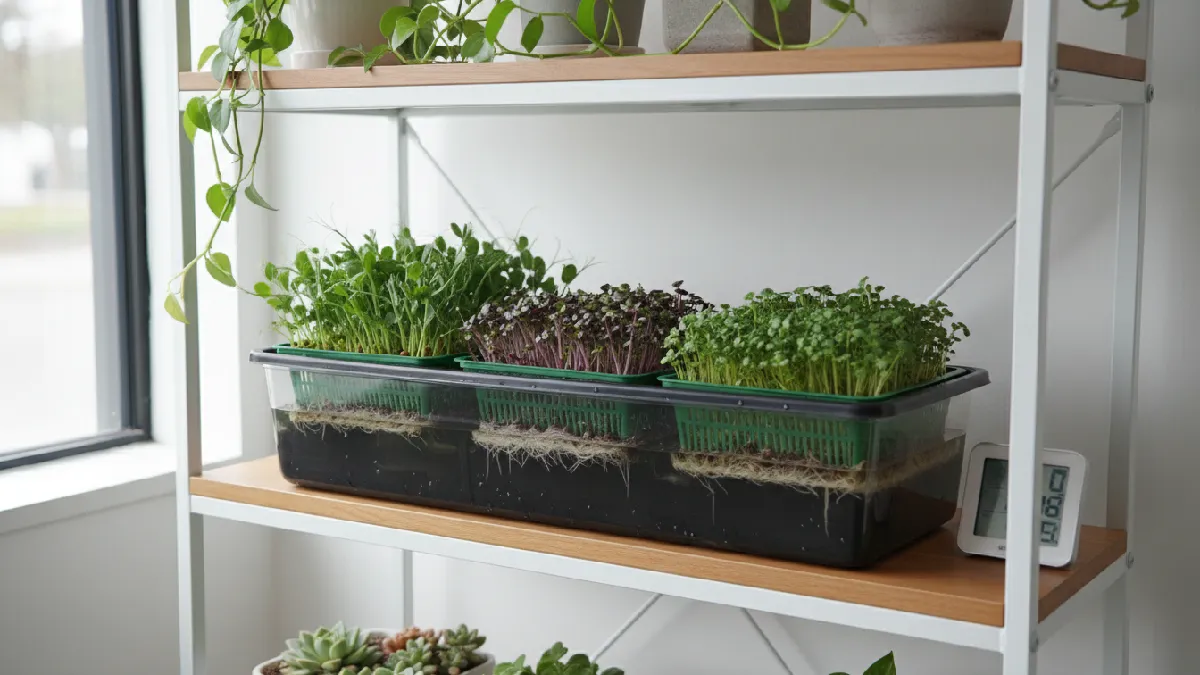
Most beginners start here. Lightweight, cheap, simple. Usually 10×20 inches. Fits shelves and racks easily. Seeds spread evenly. Watering is easy. Clean them, and they last many cycles. Nothing fancy. Just works. Reliable.
Microgreens Trays With Holes
Drainage is everything. Trays with holes stop water from pooling. Roots stay healthy. Bottom watering works perfectly here. Air moves around seeds. Mold risk drops. Indoor growing becomes less risky. Simple, effective, stress-free.
Microgreens Trays Without Holes
These have a special use. The blackout phase is their main job. Seeds need darkness; they get it here. Also used as catch trays under other trays. Stops water from spilling. No drainage, yes. Still practical. Works in controlled setups.
Hydroponic / Mesh Trays
Soil-free growing. Seeds sit on mats or mesh pads. Watering is clean. Mess is minimal. Roots get plenty of air. Cleaning is fast. Pros like these. Faster growth. Cleaner harvest. Slightly pricey but worth it.
Eco-Friendly & Compostable Trays
Sustainable trays are growing in demand. Compostable, biodegradable. Some reusable, some disposable. Ideal for home growers or eco-conscious setups. Don’t last as many cycles as plastic. But better for the planet. Functional and responsible.
Microgreens Tray Sizes Explained
Tray size decides how well your seeds grow. Too big or too small, and things get tricky. Water, roots, and space all matter.
The right tray keeps things simple. Here’s a breakdown of common sizes and what works best.
10×20 Trays (Industry Standard)
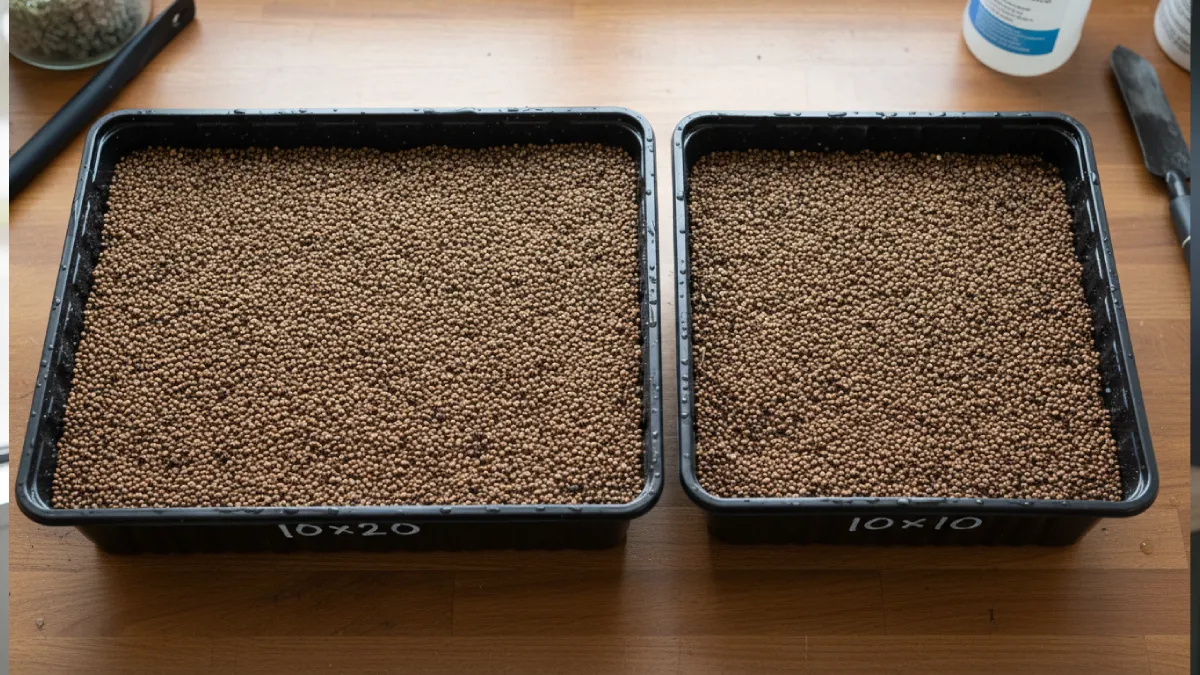
The 10×20 tray is everywhere. Home growers, small businesses, and almost everyone use it. Fits shelves and racks. Seeds spread evenly. Watering is easy. Large enough for a good harvest but not too heavy to handle. Beginners usually start with this. Works with almost all systems. Reliable. Simple.
10×10 Trays (Small Batches)
Smaller trays are great for experiments or tiny harvests. 10×10 inches is easy to manage. Less space, less mess. Watering is faster. Perfect if you want to try new seeds without wasting much. Multiple trays fit on windowsills or counters. Harvest comes quicker. Fails cost less.
Custom Sizes
Sometimes, shelves or racks need a custom fit. Wider, narrower, longer trays are possible. Good for odd spaces or unique setups. The goal is still the same: enough space for seeds and roots to grow evenly. Custom trays make the most of your available area.
Depth Requirements (1–2 Inches Ideal)
Depth is often ignored but critical. Microgreens don’t need deep soil. 1–2 inches works best. Too shallow, roots dry fast. Too deep, water sits too long. The right depth keeps roots moist, allows airflow, and prevents mold. Small detail. Big difference.
Tray Drainage – Holes vs No Holes
Drainage is one of those things people don’t think about at first. Until something goes wrong. Plants slow down. Roots look weak.
Sometimes there’s a smell you didn’t expect. That’s usually water sitting where it shouldn’t. Tray drainage decides how that water behaves.
Trays with holes are made to let extra water escape. That’s it. Simple job. When water doesn’t stay trapped, roots stay healthier. Overwatering becomes harder to mess up. This helps beginners a lot, because most beginners water too much. Holes act like a safety net. Even if you overdo it, the damage stays limited.
Bottom watering works best with trays that have holes. You add water underneath. The tray pulls up only what it needs. The surface stays drier. Mold shows up less. Fast growers like radish, broccoli, and kale usually prefer this setup. They grow quickly and don’t like wet feet.
Trays without holes
Trays without holes work in a different way. They hold water. That sounds risky, but they still have a role. During the blackout phase, no-hole trays help keep moisture steady while seeds are waking up.
Many growers also use them as catch trays under trays with holes. Water stays contained. Floors stay clean.
Beginners often mix this up. They grow the whole crop in a no-hole tray. Water sits too long. Mold appears. Roots weaken. Others go the opposite way. Too much drainage. Not enough moisture. Edges dry out. Plants struggle.
Most experienced growers don’t pick one. They use both. Holes for growing. No holes for support. Drainage isn’t about rules. It’s about control. Once you understand how water moves, the rest feels easier. Growth improves. Problems drop. You stop guessing.
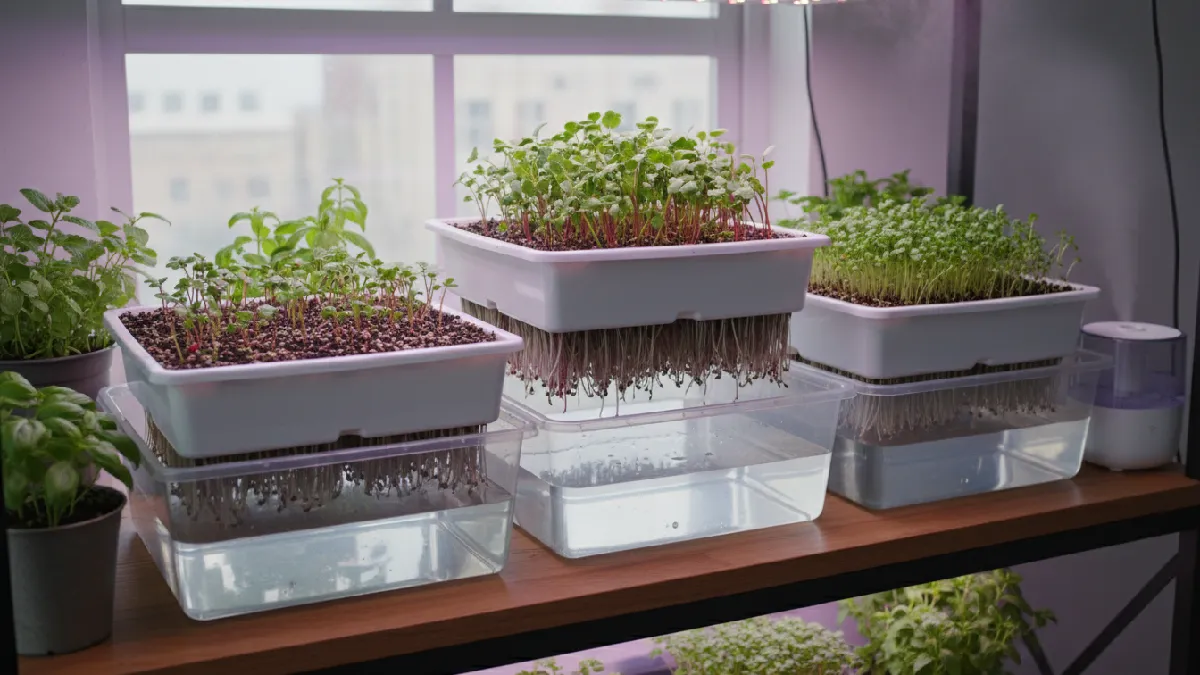
Two-Tray System for Microgreens (Best Practice)
The two-tray system looks simple. It is. But it fixes a lot of problems beginners don’t even realize they have. One tray grows the greens. The other tray controls the water.
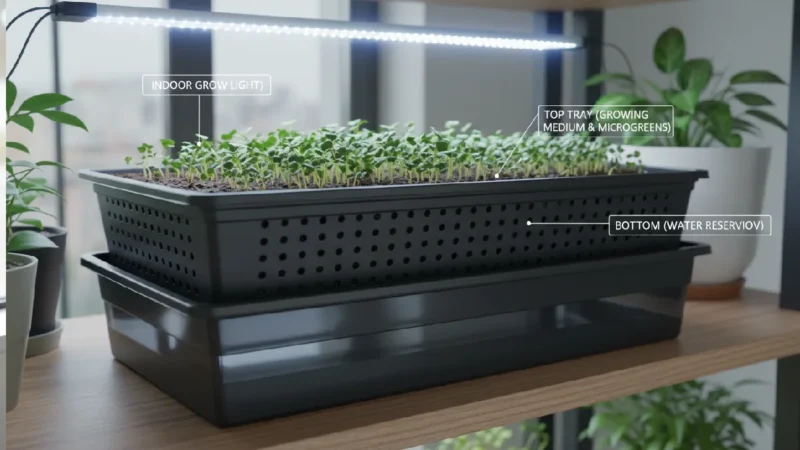
That separation alone changes everything. Less mess. Fewer mistakes. More consistent growth.
Top tray (with holes)
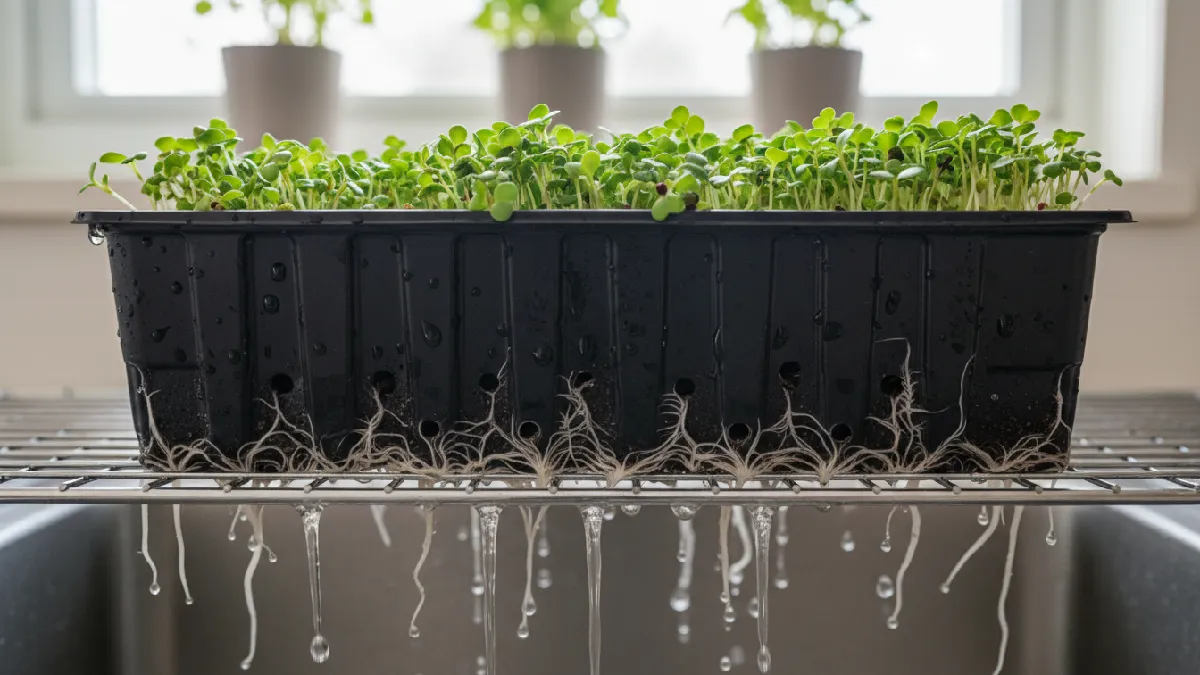
The top tray is the one with holes. This is where seeds and soil, or grow mats, sit. Roots grow down through the medium and reach toward moisture. The holes matter because they stop water from getting trapped. Roots stay moist, not soaked. Air still reaches them. Plants grow steadily instead of stressed. This tray does the growing. Nothing else.
Bottom tray (without holes)
The bottom tray has no holes. Its only job is to hold water. Think of it as support, not the main stage. You pour water into this tray, not the top one. It catches runoff or supplies moisture from below. Floors stay dry. Shelves stay clean. You don’t fight spills every time you water.
Bottom watering
Bottom watering is the real reason this system works so well. You add water to the bottom tray. The top tray absorbs moisture through the holes. Soil pulls up what it needs. When it’s done, it stops. You’re not guessing. You’re not drowning seeds from above. The surface stays relatively dry, which helps reduce mold. Seeds don’t shift around. Growth stays even.
This method is especially helpful indoors, where airflow is limited. Mold loves wet surfaces and still air. Bottom watering keeps the top layer calmer. Professionals rely on this system because it’s repeatable. Same setup. Same process. Same results. Over and over.
It also saves time. You water multiple trays faster. Less cleanup. Less checking. Less stress. Once you understand the rhythm, it becomes automatic.
That’s why pros stick with the two-tray system. Not because it’s fancy. Because it removes problems before they start. Roots grow better. Crops look cleaner. Mistakes drop fast. Sometimes the best setup is just the simplest one done right.
Best Materials for Microgreens Growing Trays
Tray material is something most people ignore at first. Big mistake. It affects safety, durability, and how long your setup actually lasts. You can grow microgreens in almost anything once. Growing them again and again is where material starts to matter. Good trays don’t just hold soil. They handle water, weight, cleaning, and time.
Food-Grade Plastic
Food-grade plastic trays are the most common choice, and for good reason. They’re made to be safe around edible crops. No strange smells. No chemical taste. No risk when trays stay wet for days. These trays handle moisture well and don’t break down easily. For anyone growing microgreens for eating or sale, food-grade plastic is the baseline. Anything below that is a gamble.
Heavy-Duty vs Thin Trays
Not all plastic trays are equal. Thin trays bend easily. Pick them up when full, and they flex. That stresses roots and spills soil. Heavy-duty trays feel solid. They hold weight without warping. They stack better. They survive cleaning. Thin trays may be cheaper, but they crack faster and need replacing often. Heavy-duty trays cost more up front, but save money later.
BPA-Free Importance
BPA is something you don’t want near food. Especially not in warm, wet conditions. BPA-free trays reduce the risk of chemicals leaching into your growing medium. This matters more indoors, where trays are reused repeatedly. BPA-free doesn’t make trays fancy. It makes them safer. That alone is worth paying attention to.
Durability & Lifespan
Durability shows up over time. After washing. After stacking. After dozens of grows. Good trays don’t crack at the corners. They don’t peel. They don’t get brittle. A durable tray can last for years if treated right. Cheap trays might last a few cycles. Then they fail. Replacing trays constantly gets expensive and annoying.
In the long run, material choice affects consistency. Strong trays mean fewer surprises. Less mess. Fewer replacements. When the tray holds up, the rest of the system stays stable. That’s what most experienced growers look for. Not fancy gear. Just materials that don’t quit early.
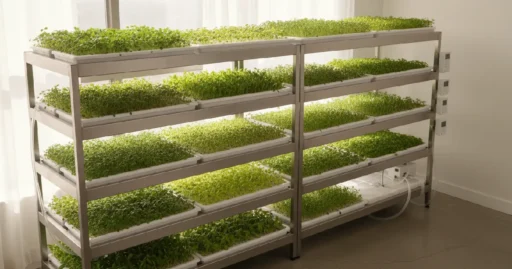
How to Set Up Microgreens Growing Trays Indoors
Indoor setup decides whether microgreens feel easy or frustrating. Same seeds, same trays, different setup. Results change fast. Indoors, you control almost everything.

That’s good. It also means small mistakes show up quickly. Tray setup is where consistency starts.
Tray Placement
Start with where the trays sit. Flat surface matters more than people think. Uneven placement causes water to collect on one side. Roots react. Growth turns patchy. Trays should sit level, stable, and easy to reach. Avoid placing them directly on the floor. Dust, cold air, and poor airflow live there. Waist or chest height works better. Easier to water. Easier to observe.
Shelf & Rack Setup
Shelves and racks keep things organized. They save space and improve airflow. Metal racks are common because they don’t absorb moisture. Plastic racks work too if they’re strong. Leave space between shelves. Crowding traps humidity. Each tray needs breathing room. Stack smart, not tight. You want access without bumping trays every time you move.
Distance From Grow Lights
Light distance matters. Too close, heat builds up. Too far, growth stretches and weakens. Most grow lights work best when placed a few inches above the trays. Adjust as plants grow. Watch the leaves. If they stretch, the light is too far. If they curl or dry, it’s too close. This part takes observation, not guessing.
Air Circulation Tips
Air doesn’t need to blast. It just needs to move. Still air causes problems. Mold loves it. A small fan nearby helps a lot. Not pointed directly at trays. Just enough to keep air moving around them. This strengthens stems and keeps surfaces from staying wet too long. Indoors, airflow replaces nature’s breeze.
Temperature & Humidity
Microgreens prefer steady conditions. Not hot. Not cold. Room temperature usually works fine. Extreme changes stress plants. Humidity should stay balanced. Too dry, trays dry out fast. Too humid, mold risk increases. If the room feels comfortable for you, it’s usually okay for microgreens. Watch condensation. That’s a warning sign.
Indoor growing isn’t about perfect numbers. It’s about balance. Light, air, water, space. When trays are set up right, maintenance becomes easier. Fewer problems. More predictable harvests. You stop reacting and start repeating results. That’s when indoor microgreens feel simple instead of stressful.
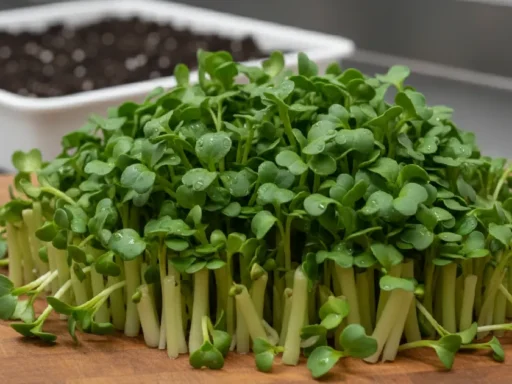
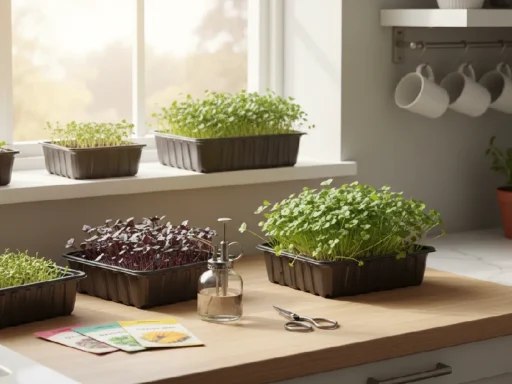
How to Use Microgreens Trays Step by Step
Using microgreens trays looks easy from the outside. In reality, small things matter. Miss one step and problems show up later. Mold, weak growth, uneven harvest. This is how most growers actually do it, not how manuals explain it.
Tray Cleaning Before Use
First thing. Clean the tray. Always. Even if it’s new. Dust sits there. Old trays are worse. Warm water is enough most days. Mild soap sometimes. Rinse properly. No smell left behind. Dirty trays don’t wait long to cause trouble.
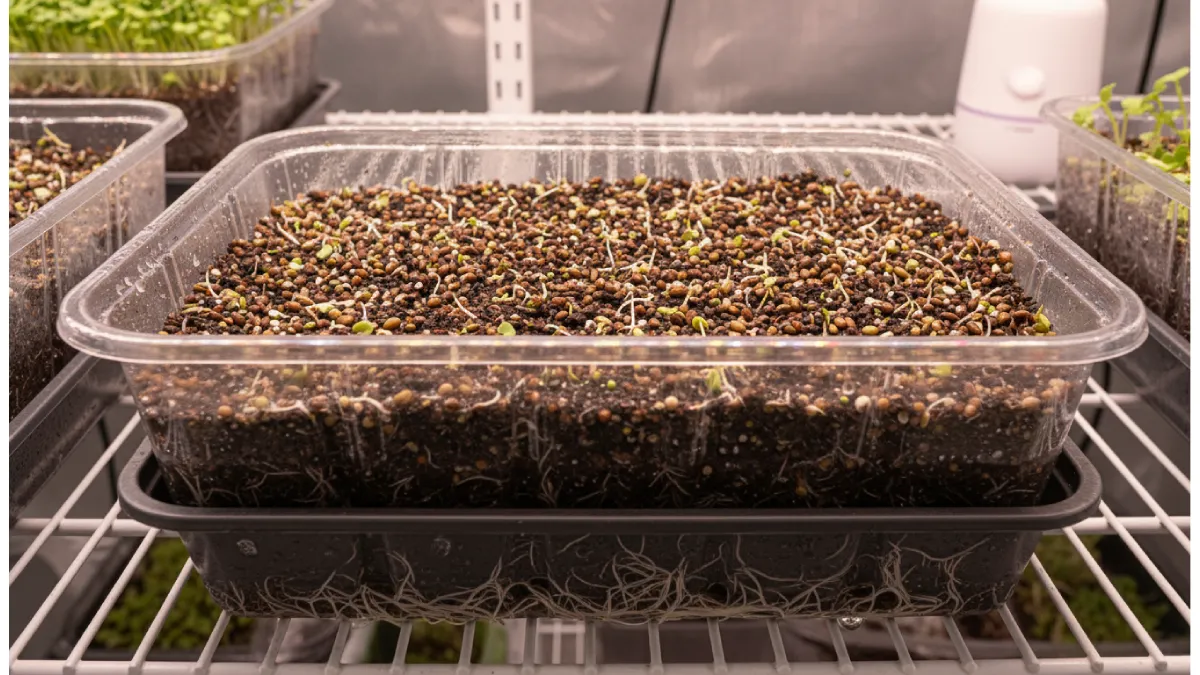
Filling the Growing Medium
Add the growing medium slowly. Soil, coco coir, whatever you use. Spread it with your hand. Don’t press hard. Roots hate compacted soil. About one to two inches is enough. Level it roughly. Doesn’t need to look perfect. Mist it so it feels damp, not wet. If water pools, stop.
Sowing Seeds Evenly
Seeds decide the final look. Pour them gently. Move them around with your fingers. Avoid piles. Crowded seeds fight each other. Spread out the seeds to waste space. After spreading, press lightly so they touch the surface. Don’t bury them. Just contact is fine
Blackout Phase Using Trays
Now comes darkness. Stack another tray on top or cover them. Some weight helps. Not too much. Seeds need pressure, not crushing. Keep trays warm. Check once a day. If it feels dry, mist lightly. This stage helps roots lock in and shoots grow straight. Rushing here causes weak plants later.
Moving Trays to Light
Shoots start lifting the cover. That’s your signal. Move trays to the light. Grow lights or a bright window both work. Remove the cover slowly. Plants will look pale at first. That’s normal. Color returns in a day or two.
Watering Routine
Watering ruins more crops than bad seeds. Bottom watering works best. Pour water into the lower tray. Let the top tray pull it up. Surface stays calmer. Mold stays away. Check daily. Water when it feels light. Not on a fixed schedule. Plants don’t follow clocks.
Using trays like this becomes muscle memory. Clean. Fill. Seed. Cover. Light. Water. Over time, you stop thinking so much. Growth becomes steady. Harvest looks cleaner. That’s when microgreens start feeling simple instead of stressful.
Cleaning & Reusing Microgreens Growing Trays
Most growers focus on seeds and lights. Trays usually get ignored. That’s where problems start. After harvest, trays hold moisture, tiny root pieces, and residue you can’t always see.
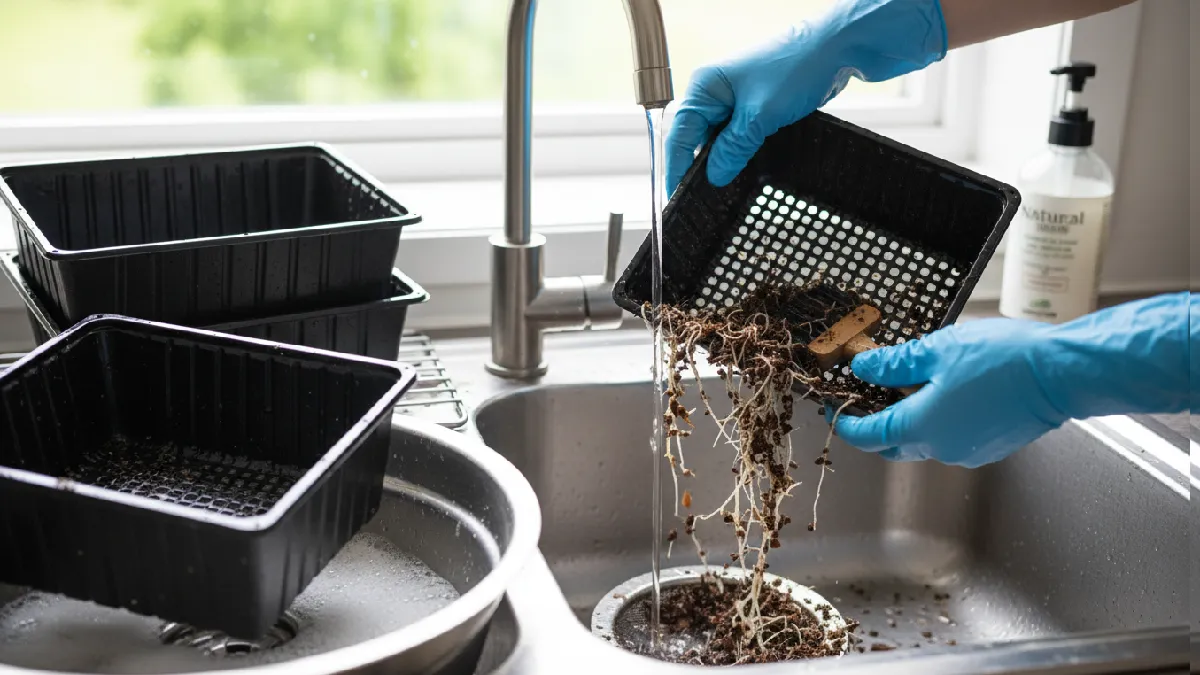
If trays go back into use like this, the next crop struggles from day one. Cleaning keeps the growing cycle stable.
Cleaning After Harvest
Clean trays as soon as harvesting is done. Don’t wait. Dry roots stick hard later. Shake out the leftover growing medium first. Rinse the tray under normal water. Use fingers or a soft brush. Pay attention to edges and corners. Dirt hides there more than anywhere else. No need for pressure washers or tools.
Sanitizing Methods
After basic cleaning, light sanitizing helps. Simple dish soap is enough for most home growers. Some use vinegar mixed with water. A few prefer diluted bleach, but very weak. Strong solutions damage trays over time. Rinse everything properly. Trays should feel clean, not smell strong.
Mold Prevention
Mold survives when moisture stays trapped. That’s why drying matters. Let trays air-dry fully before stacking. Never stack wet trays. Airflow during drying reduces mold risk more than chemicals. If trays feel cool or damp, they’re not ready yet.
How Many Times Can Trays Be Reused
Reuse depends on tray strength. Thin trays bend and crack early. Heavy trays last longer and stay flat. With regular cleaning, good trays handle many grow cycles. Once trays warp or split, replace them. Damaged trays cause uneven water flow and stress plants.
Clean trays don’t just look better. They protect your next crop. Skipping cleaning saves minutes, but costs yield later. Consistent habits keep microgreens healthy run after run.
Common Problems With Microgreens Trays & Solutions
Microgreens trays are easy to ignore. Most people do. They think trays are just holders. Plastic boxes. That’s it. But many growing problems start here. Quietly. You only notice when a batch goes wrong.
Mold in Trays
Mold shows up when trays stay wet. Too wet. All the time. No break. Water sits. Air does not move much. That’s enough. People try sprays and chemicals. Waste of time.
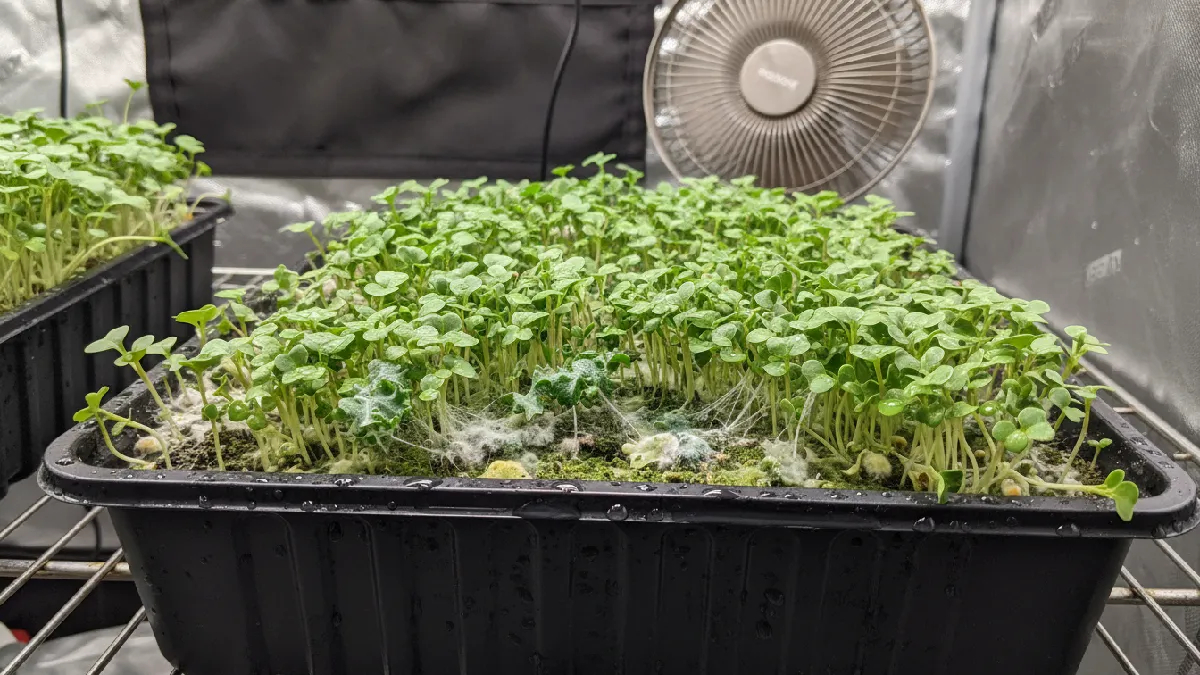
Less water works better. Let the top dry a little. Drainage holes must be open. Trays must dry after washing. Wet trays invite mold back again.
Cracked Trays
Cheap trays crack. It happens fast. One wash, one drop, some pressure. Small crack first. Then leaks. Bottom watering stops working right. Tape helps for one run, maybe. After that, forget it. Replace the tray. Thick trays last longer. They don’t bend or split easily.
Poor Drainage
Bad drainage causes slow growth. Roots sit in water. No air. Plants look tired. Sometimes yellow. Holes are blocked or missing. Check them before using the tray. If you use trays without holes, control the water level below. Flooding ruins everything.
Warping Under Lights
Lights give heat. Plastic feels it. Trays close to lights bend slowly. You don’t notice at first. Then water pools on one side. One side grows faster. The other side struggles. Move trays lower. Increase distance. Strong trays help here.
Smell Issues
Trays should not smell bad. If they do, something is wrong. Old roots. Dirty trays. Too much water. Clean trays after harvest. Let them dry fully. Never stack them wet. Smell means air is missing.
Simple Truth
Tray problems build slowly. Not one day. Many days. Small signs first. If ignored, crops fail. Good trays, less water, airflow, and cleaning. Nothing fancy. Just basics done right.
FAQs – Microgreens Growing Trays
What size trays are best for microgreens?
Most growers use 10×20 trays. Not because they are special, but because they are easy to handle. They fit shelves, lights, and racks. Yield is balanced, not too much, not too little. Smaller trays also work, but watering becomes tricky. For learning and regular use, 10×20 feels stable and predictable.
Do microgreens trays need drainage holes?
Holes make things easier. Water drains out instead of sitting inside. Roots get air. Mold risk drops. Without holes, water control becomes harder. Some growers still use no-hole trays, mostly as bottom trays. For growing itself, holes reduce mistakes, especially for beginners.
Can I use normal plastic trays for microgreens?
Yes, you can. Many people start like that. But results are not always good. Normal trays often hold too much water. No airflow below. Sometimes corners stay wet. That causes issues later. Dedicated microgreens trays are shallow and designed for this job. They behave more consistently over time.
How deep should a microgreens tray be?
Microgreens don’t need deep soil. Roots stay close to the surface. Around one to two inches is enough. Deeper trays waste medium and hold extra moisture. Very shallow trays dry out fast. A balanced depth keeps watering simple and roots comfortable.
How long do microgreens trays last?
It depends on tray quality. Thin trays crack early. Heat, washing, and pressure all damage them. Heavy trays last longer if handled properly. Cleaning and drying matter more than people think. Once a tray bends or leaks, it creates problems. At that point, replacing is better.
Are reusable trays safe for food growing?
Reusable trays are safe if they are clean. That’s the main rule. Food-grade plastic is better, but cleaning matters more. After harvest, wash trays properly. Let them dry fully. Wet, dirty trays cause problems. Clean trays are used again and again by growers without issues.
Conclusion
Trays matter. Small tray, big difference. Size, holes, depth, and material. All affect roots, water, and growth. Right tray easy watering, less mold, even growth. Beginners, relax. Don’t buy many trays. One tray enough. Learn water, learn roots. Confidence comes from trying, not reading.
Start small. One tray, one batch. Learn, fix mistakes, try again. That’s how everyone starts. Questions? Comment below. Want more tips? Check guides. Found this useful? Share it with a friend who wants to grow microgreens.